1How labs work here
When you order a test, Aminova makes a requisition: the sheet the draw site works from. You print it, fax it to the lab, or hand it to the patient. If your clinic orders through a connected lab, the order goes to the lab directly instead.
Results come back one of three ways: you upload the report, the lab faxes it to your results fax number, or a connected lab sends it. Whichever way, the patient sees nothing until someone on your team reviews it and releases it.
2Open your lab billing accounts
- 1Go to Labs in the sidebar.
- 2Click Lab billing accounts, just above the tabs.
- 3It opens a card for each lab. Fill in only the labs you use.
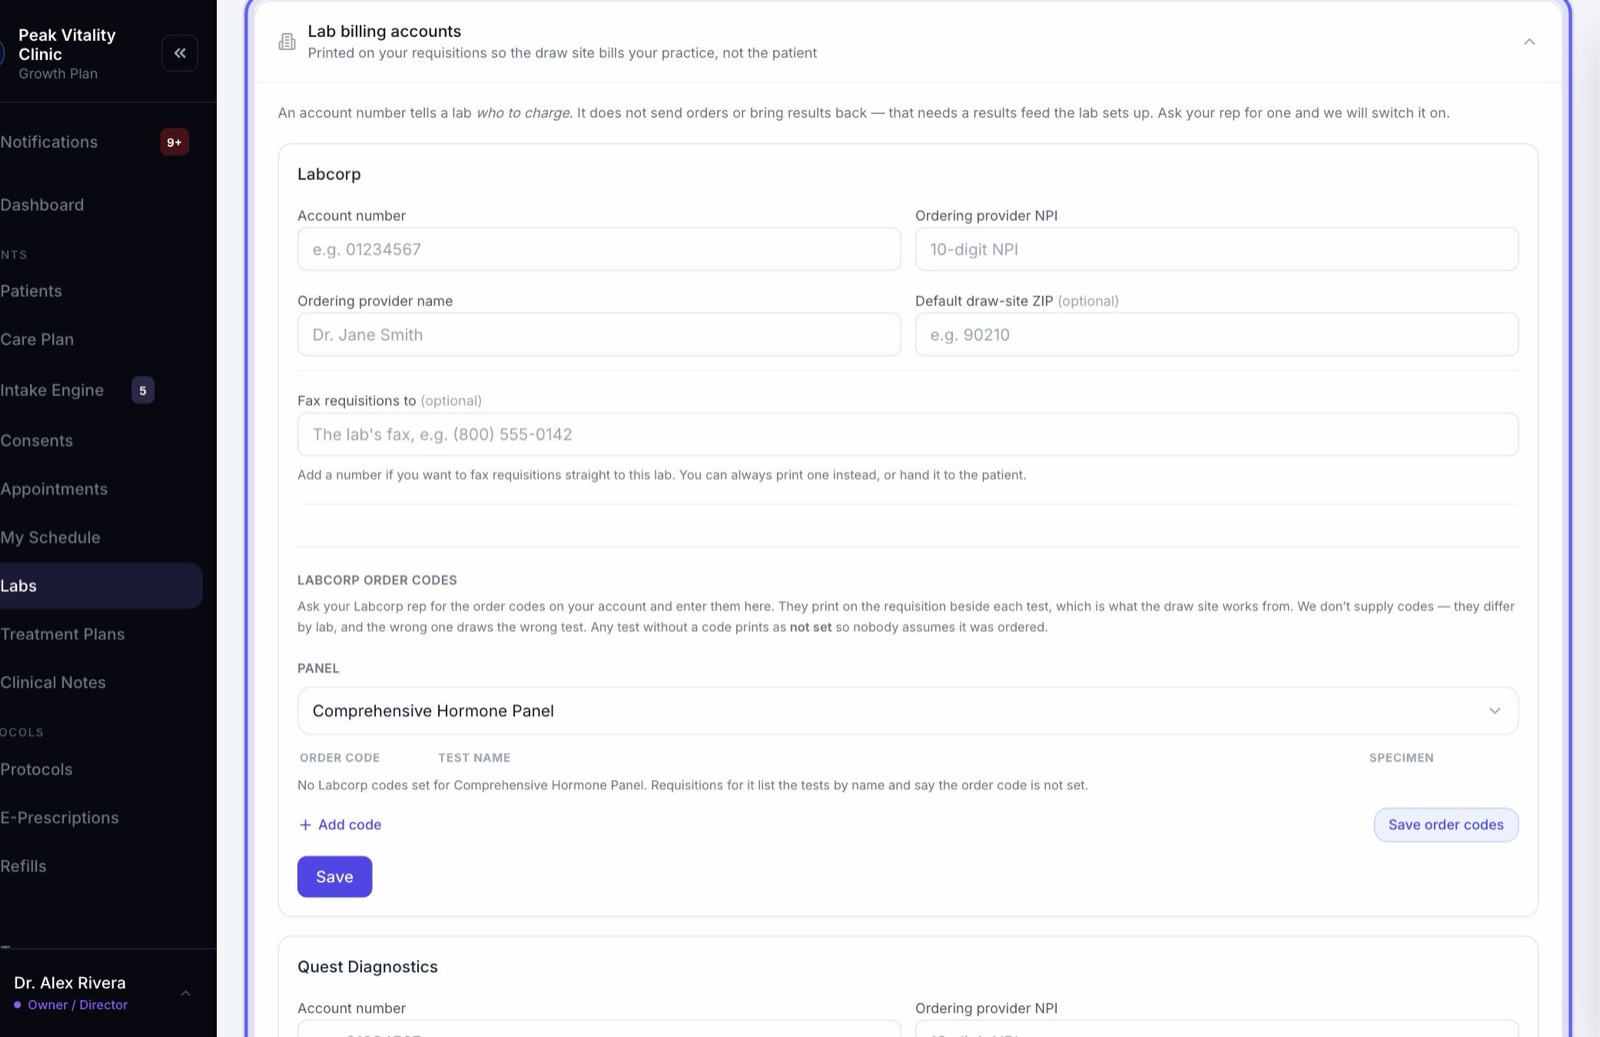
3Add your account with each lab
- 1Enter your Account number with that lab. Your lab rep can give it to you.
- 2Enter the Ordering provider NPI and Ordering provider name.
- 3Add a Default draw-site ZIP if you like. It is optional.
- 4Press Save. You’ll see Saved.
The account number is printed on your requisitions so the draw site bills your practice, not the patient. It tells the lab who to charge. It doesn’t send orders or bring results back.
4Add your order codes
- 1Ask your lab rep for the order codes on your account.
- 2On the lab’s card, under its order codes, choose a Panel.
- 3Press Add code. Type the Order code, the Test name as the lab names it, and the Specimen if you know it.
- 4Press Save order codes. Do this for each panel you order.
We don’t supply codes, because they differ by lab. A test with no code prints as not set, so nobody thinks it was ordered.
5Fax requisitions to the lab (optional)
- 1On the lab’s card, type the lab’s fax number under Fax requisitions to, and press Save.
- 2Press Send a test page. It sends a page with no patient information on it.
- 3Once the lab’s machine confirms it arrived, the card says Verified — a test page reached this number.
- 4From then on, open orders show a button to fax the requisition to that lab.
Requisitions can’t be faxed to a number until it is verified. A wrong number would send a patient’s details to a stranger. If you change the number, verify it again.
6Get results by fax
- 1If your clinic has a fax number in Aminova, it shows at the top of Lab billing accounts as Your results fax number.
- 2Press Copy and give it to your lab rep. Ask them to send your results there.
- 3Faxed results arrive in Labs → Results Inbox, under Waiting for a chart. The values are read off the page for you.
- 4You confirm whose chart each one goes on, then review it like any other result.
Nothing arrives until the lab is asked. The number on its own changes nothing.
7Or connect your lab
A connected lab sends results back to Aminova on its own. Ask your lab rep for a results feed, then tell us. We switch it on. Results from it arrive in Results Inbox for review.
Some connections also take your orders. Then the order button on Labs says Order labs, and results for those orders file to the patient’s chart by themselves. Otherwise it says Create Requisition. Until a connection is on, bring results in by fax or upload.
8Or upload results yourself
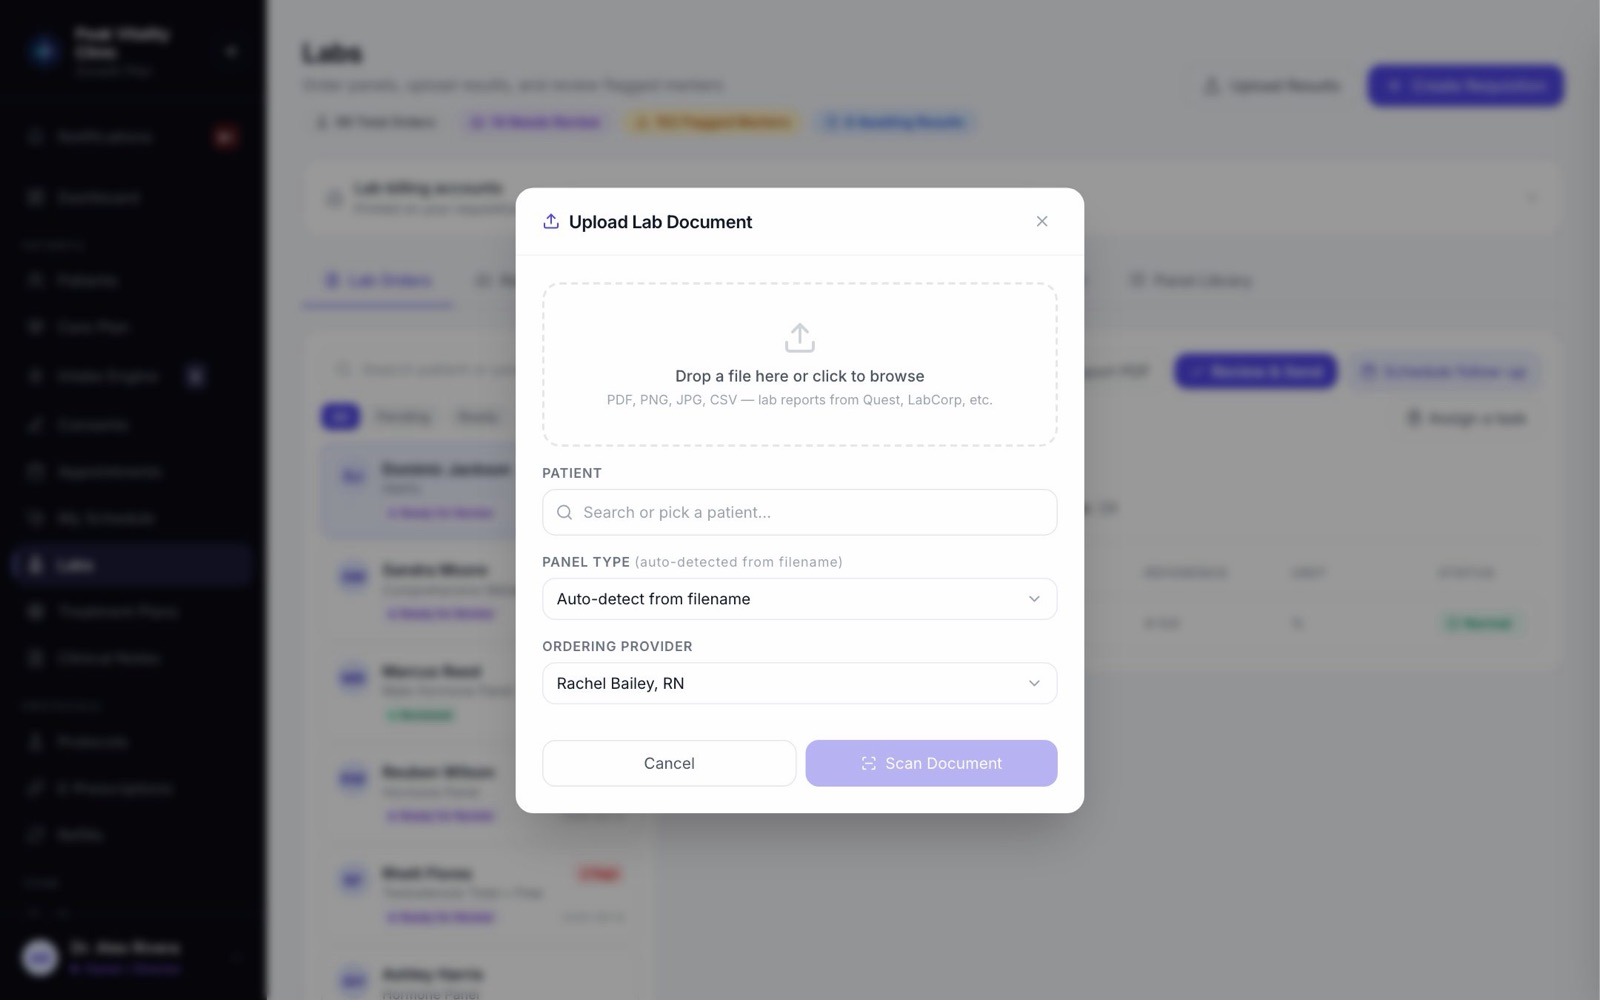
- 1On Labs, click Upload Results.
- 2Drop in the PDF or a photo of the report, and pick the Patient.
- 3Press Scan Document. Check the values against the page, then press Done.
- 4Have a stack of old reports? The Bulk Import tab takes up to 40 at once.
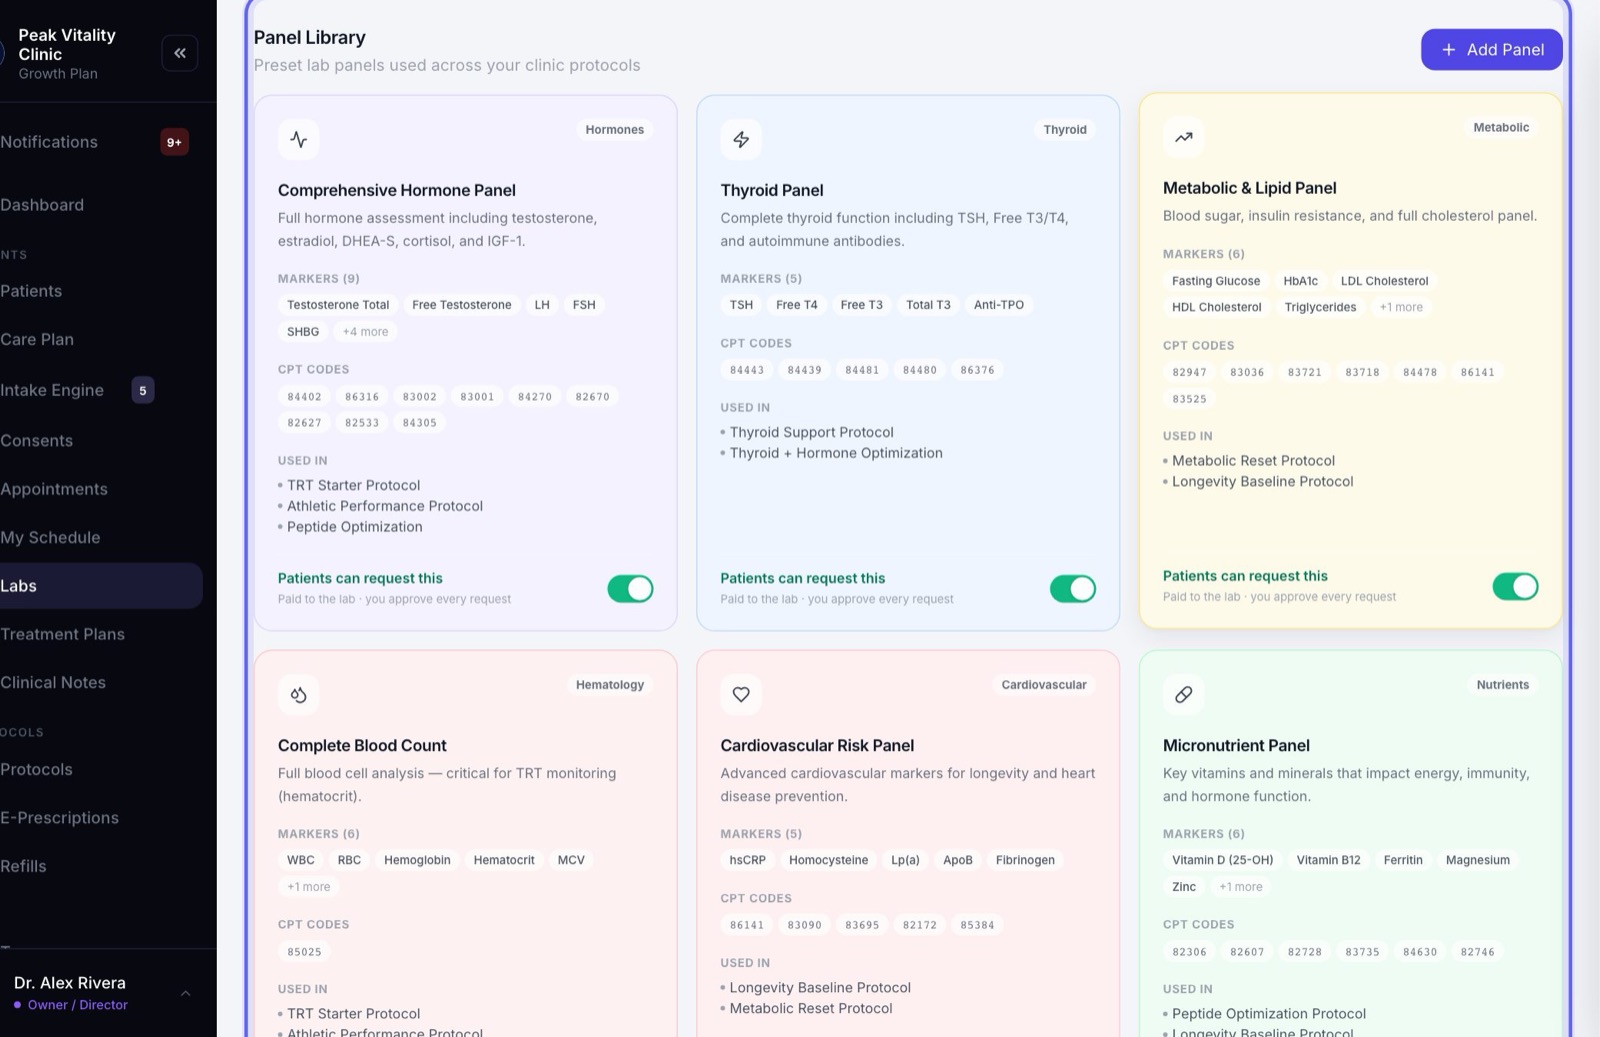
9Check your panels
- 1Open the Panel Library tab. The common panels are already there.
- 2To add your own, press Add Panel.
- 3Fill in the Panel Name, Category, Color, Icon and Description.
- 4List the Markers, and the CPT Codes if you use them, separated by commas. Press Save Panel.
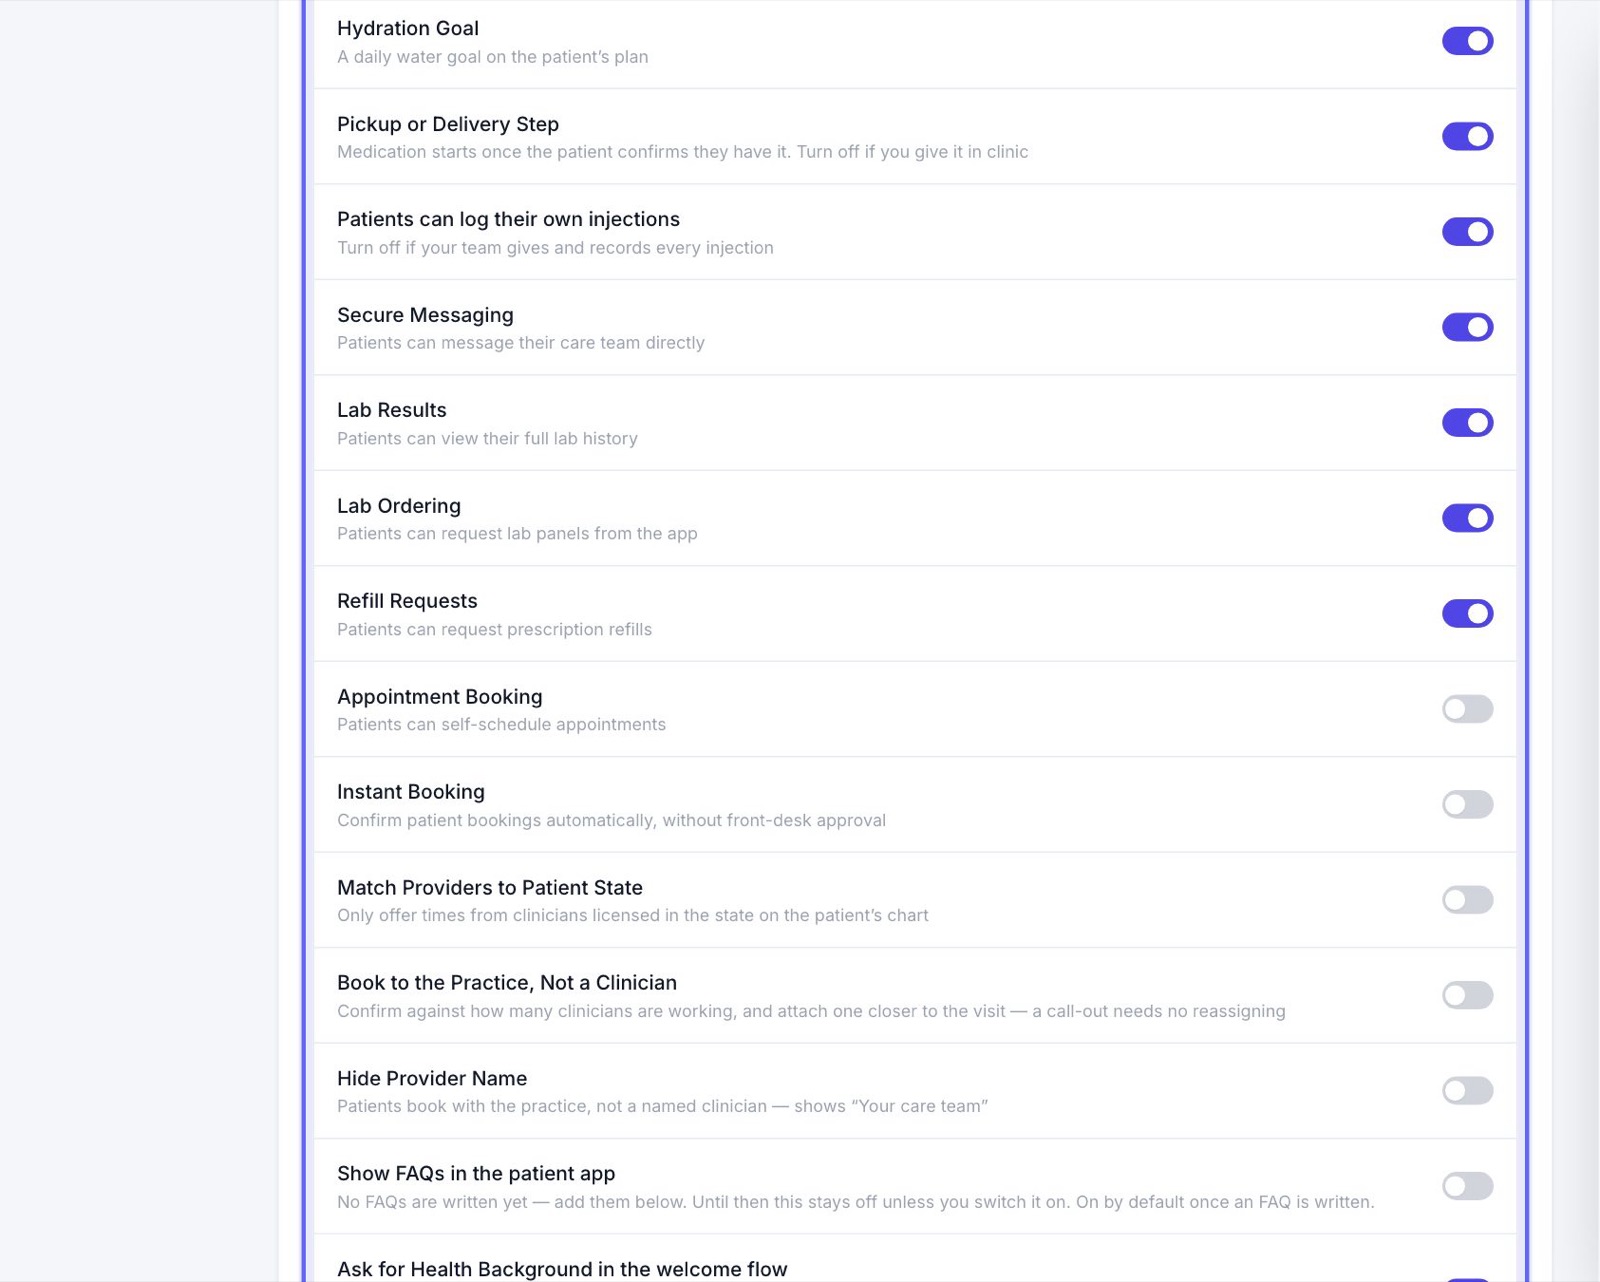
10Choose what patients can ask for
- 1In Panel Library, turn on the switch on each panel patients may ask for. It then says Patients can request this.
- 2Go to Settings → Patient Portal. Under Portal Features, keep Lab Ordering on, and press Save Changes.
- 3Requests land on Labs → Requests, where a clinician approves or declines each one.
Patients pay the lab directly. You approve every request.
11Let patients see their results
In the same Portal Features list, Lab Results lets patients see their lab history in their app.
Even with it on, a patient only ever sees a result after someone on your team releases it. That can’t be turned off.
12Set your lab targets (optional)
- 1Go to Settings → Clinic Profile and find Lab targets.
- 2Press Add target. Type the Marker, as the laboratory prints it, and its Unit.
- 3Choose who it is For, and add an age range if you like.
- 4Set Target from and Target to. Leave one empty for only a floor or only a ceiling. Press Save target.
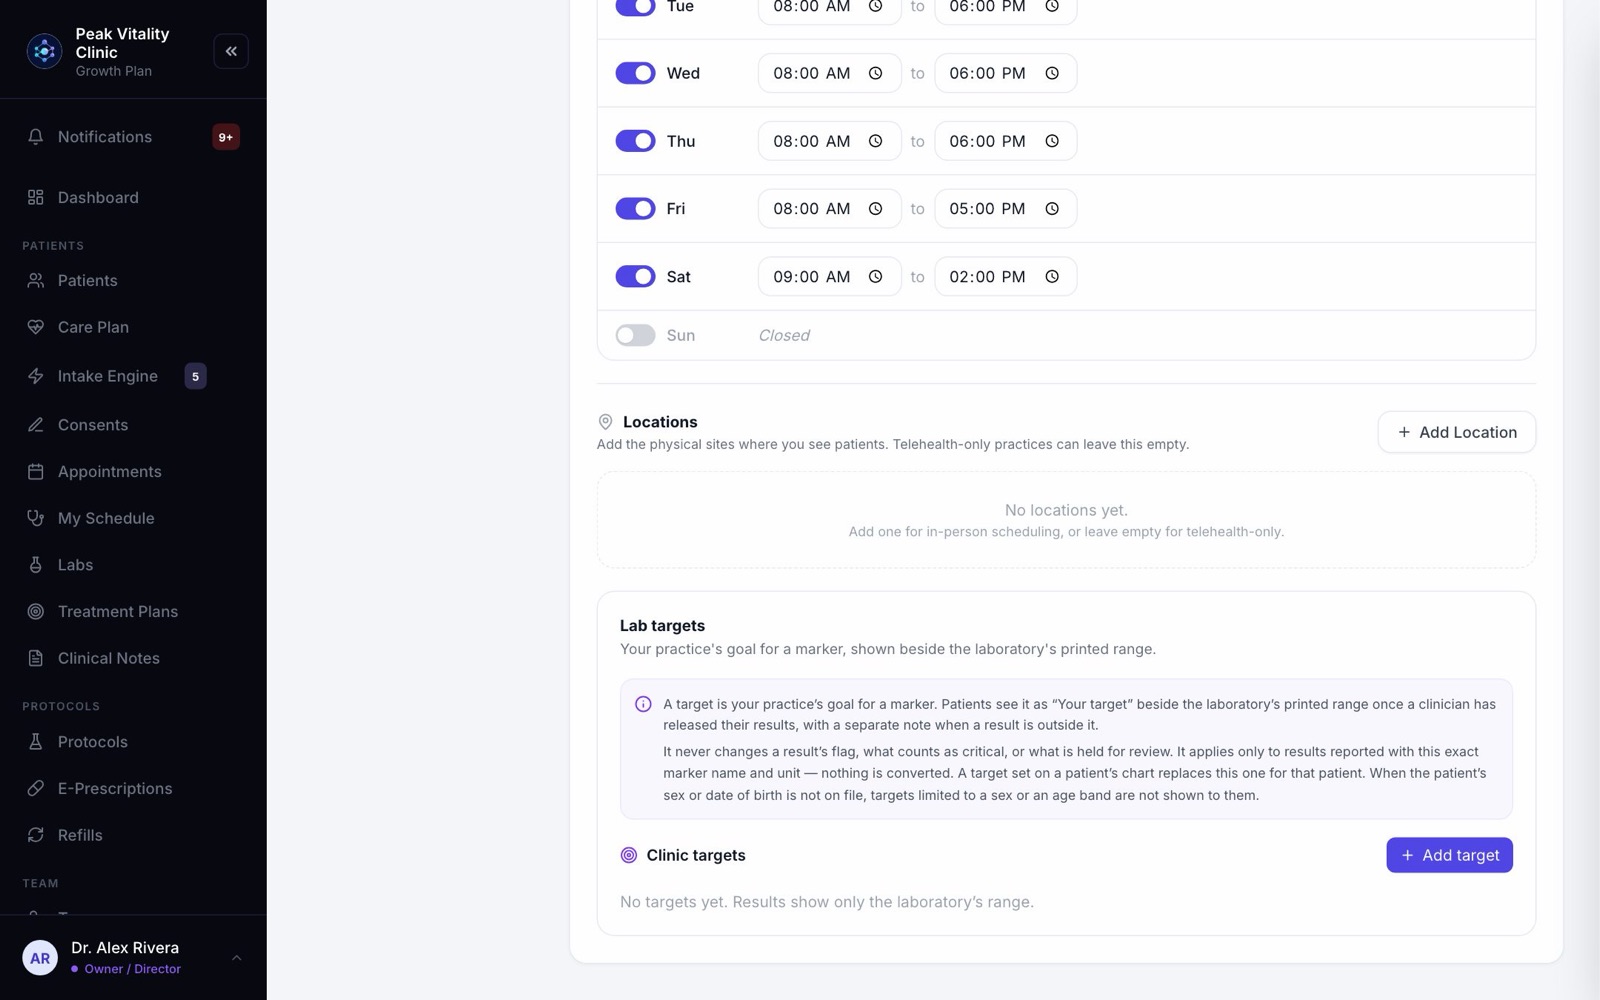
Patients see it as “Your target” beside the lab’s own range once a result is released. It never changes a flag. A target set on a patient’s chart replaces yours for that patient.
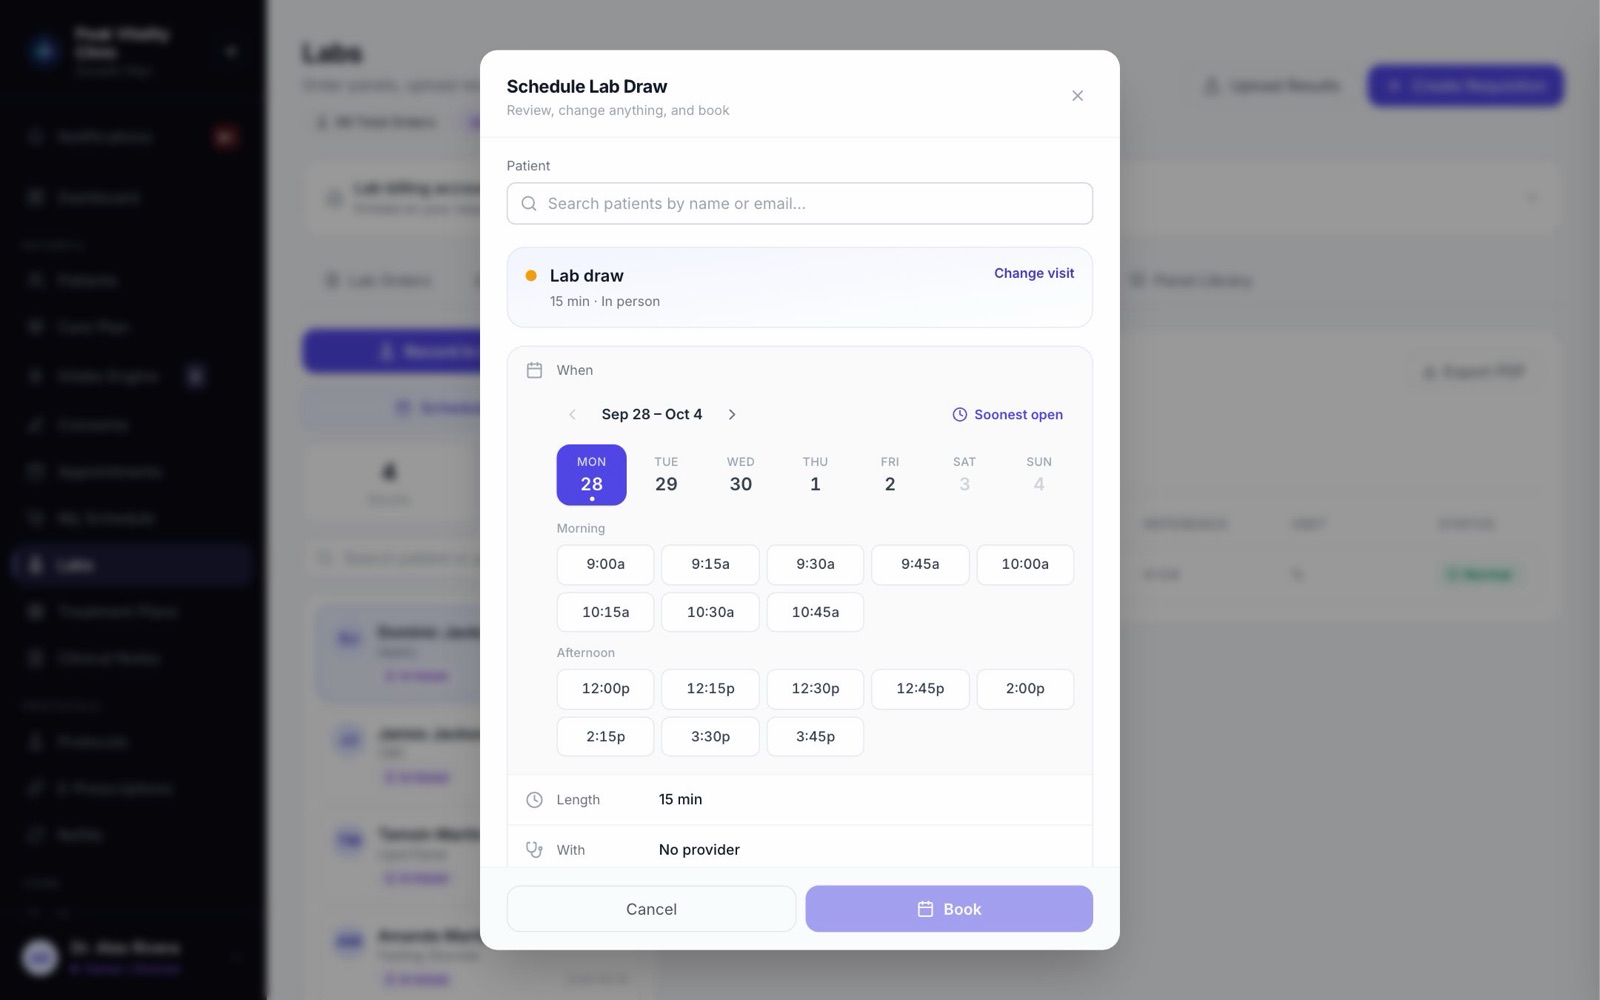
13Get ready to book draws
- 1On Labs, open In-House and press Schedule Lab Draw.
- 2It offers your lab-draw visit types, like one named “Lab draw”.
- 3If you have none, press Add a “Lab draw” visit type. It makes a 15-minute, in-person visit that isn’t on your booking link.
14Try it on your practice patient
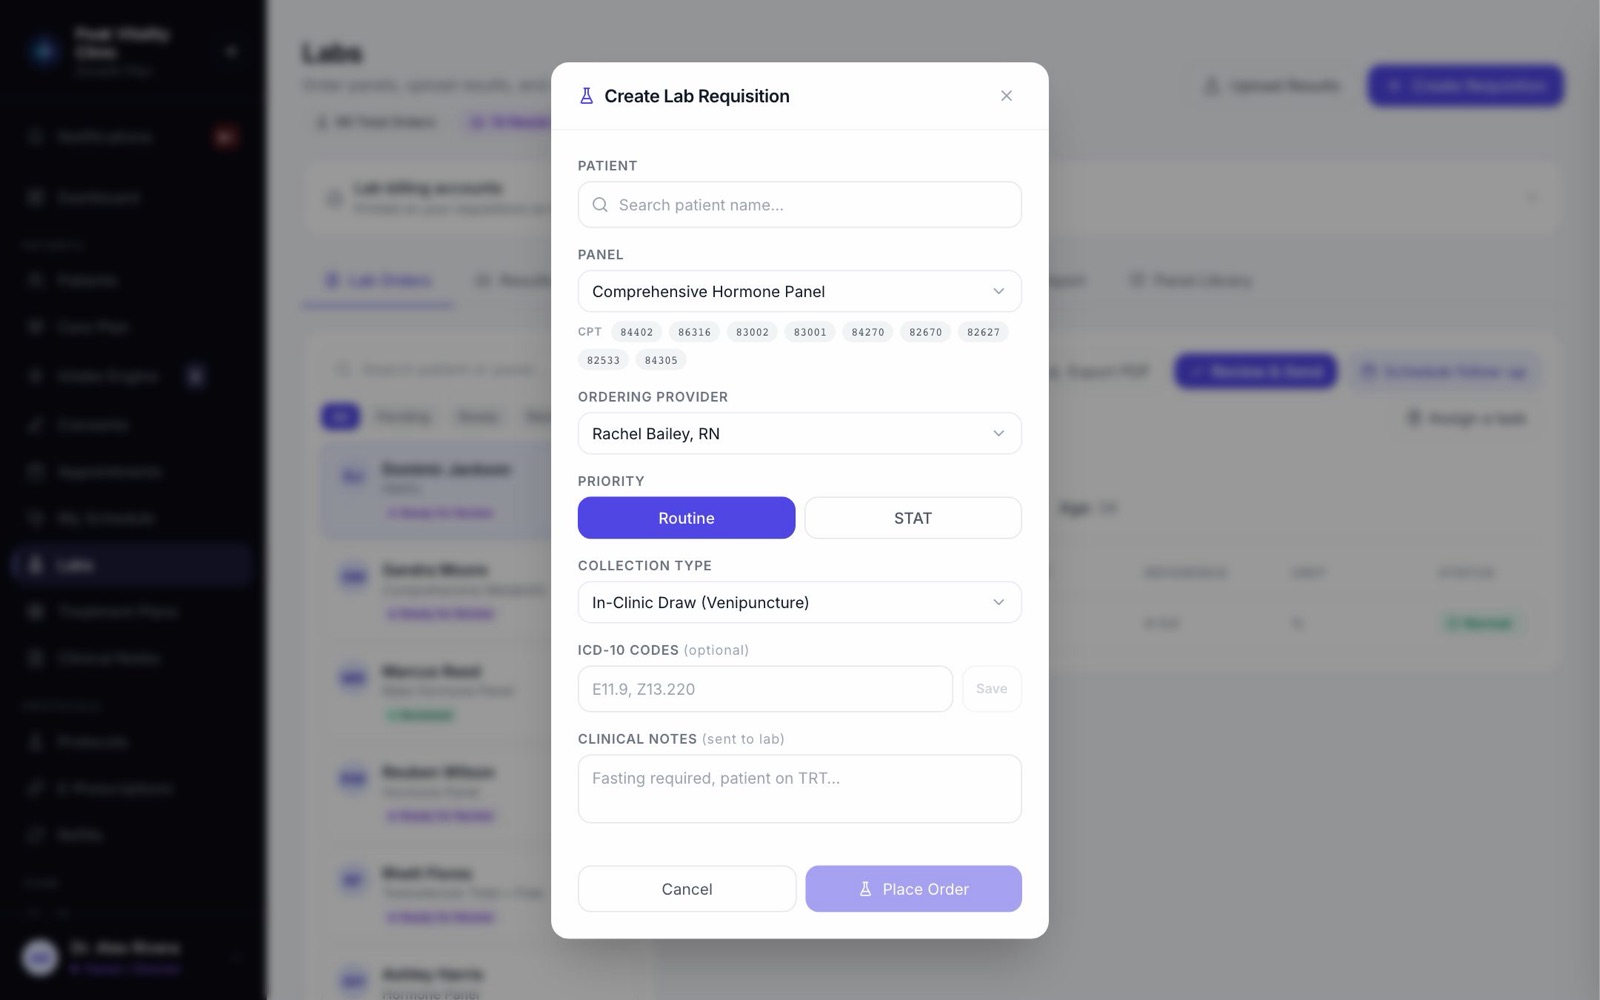
- 1On Labs, press Create Requisition and pick your practice patient. If you order through a connected lab, skip the test order: it would go to the lab.
- 2Place the order, then press Print Requisition. Check your account number and order codes are on it.
- 3If something the lab needs is missing, a box lists it. Fill it in and print again.
- 4That’s it. Your labs are set up.
Practice patients never get emails, texts or bills, so they’re safe to test with.
Keep going
Labs
Order tests, bring results in, and review them before patients see them. Every lab in the clinic, on one page.
Read the guideLab orders and results
One lab, start to finish: the order, the draw, the result coming back, your review, and the moment the patient gets to see it.
Read the guideSet up your visit types and booking link
Build each kind of visit once: its length, providers, rooms, price and forms. Then turn on the link patients book from.
Read the guideSet up your patient app
Choose your clinic code, what patients can do in the app, who they can message, and what they are told. Then give patients their sign-in details.
Read the guideRather be shown?
Inside Aminova, the tutorial walks you through every page, and the Getting started checklist shows you each task click by click. Or book a live training session with our team.