1How a lab moves through Aminova
Every lab follows the same path. You order it. The sample is taken. The result comes back to Aminova. Someone on your team reviews it. Then it is on the chart, and the patient sees it when you release it.
Nothing reaches the patient before that last step. A result can sit on the chart, signed off, and still be hidden from them.
2Order the test
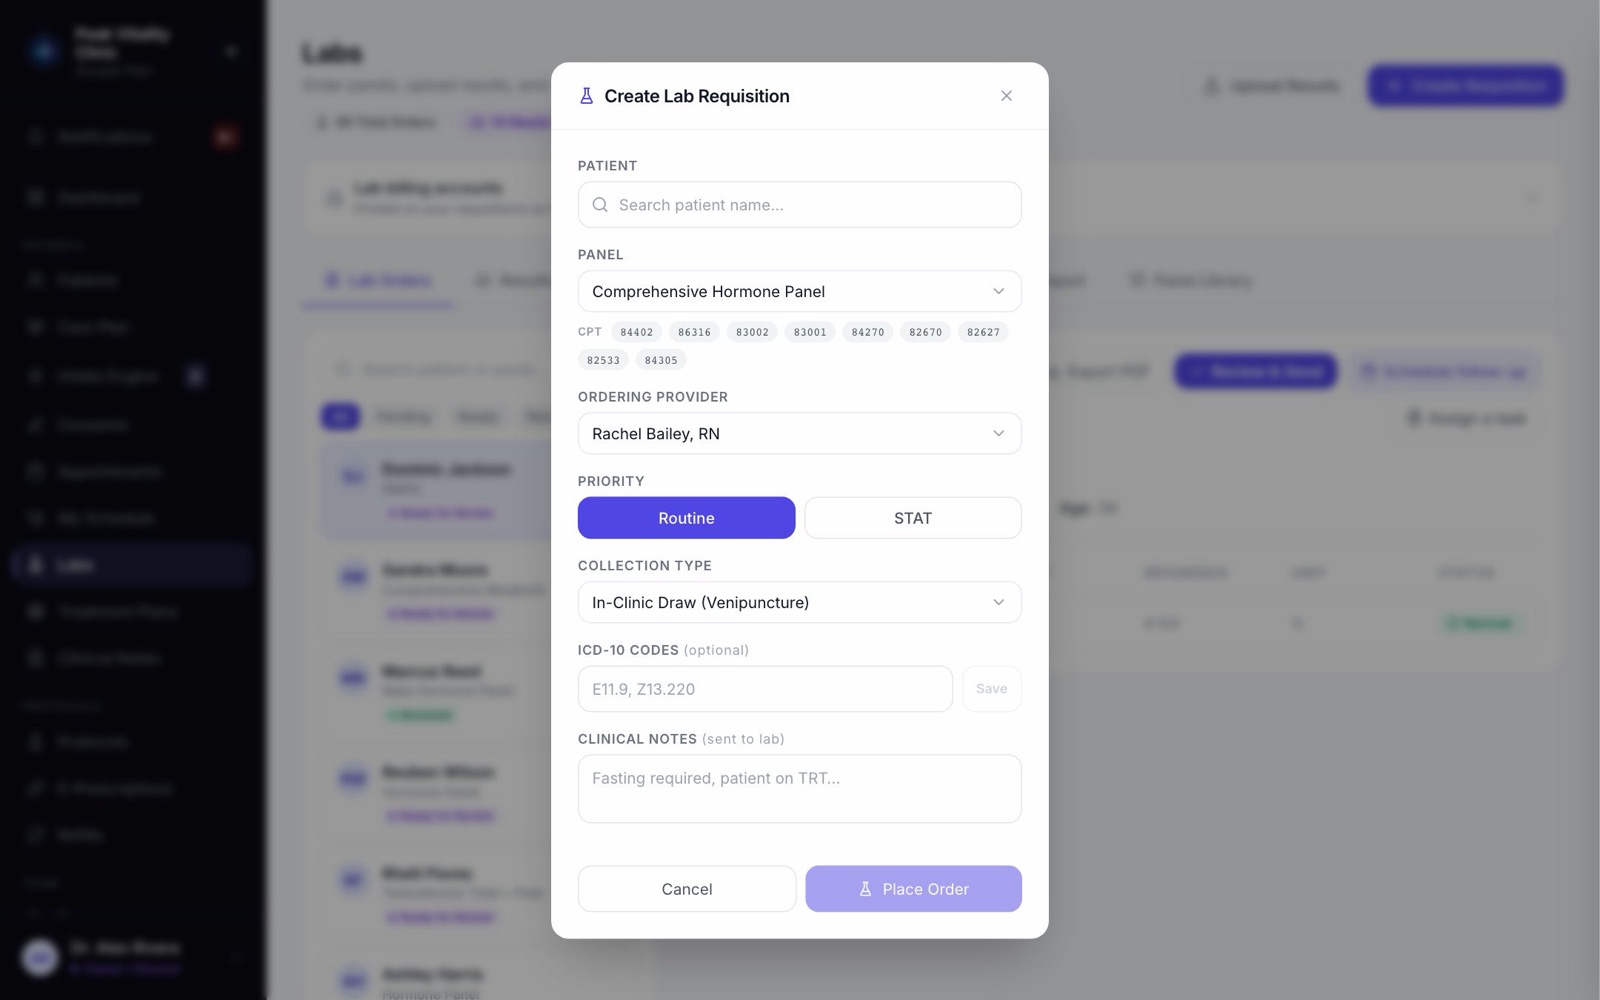
- 1On Labs, press Create Requisition.
- 2Pick the Patient and the Panel. The panel’s CPT codes show under it.
- 3Check the Ordering Provider, and choose Routine or STAT.
- 4Choose the Collection Type: an in-clinic draw, a draw site, an at-home kit, and more.
- 5Add ICD-10 Codes if you need them. Owners and managers can press Save to keep them. Anyone can click a code under Saved to add it.
- 6Add Clinical Notes for the lab, like “Fasting required”. Press Place Order, or Place STAT Order.
3If you order through a connected lab
- 1The button says Order labs instead.
- 2Pick the Patient and the Lab test, then press Place order.
- 3The order goes to the lab. When the lab returns the result, it files to the patient’s chart by itself.
4Print or fax the requisition
- 1Right after ordering, you see Requisition Created with its number. Press Print Requisition and give it to the patient, or send it with the specimen.
- 2Later, open the order on Lab Orders and press Requisition to print it again.
- 3If a lab’s fax number is set up and verified, a fax button sits beside it. Press it to send the requisition to that lab. You’ll be told if it doesn’t arrive.
- 4If the sheet is missing something the lab needs, a box says This requisition is not complete and lists it. Fix it, or press Print it anyway, marked incomplete.
5The draw
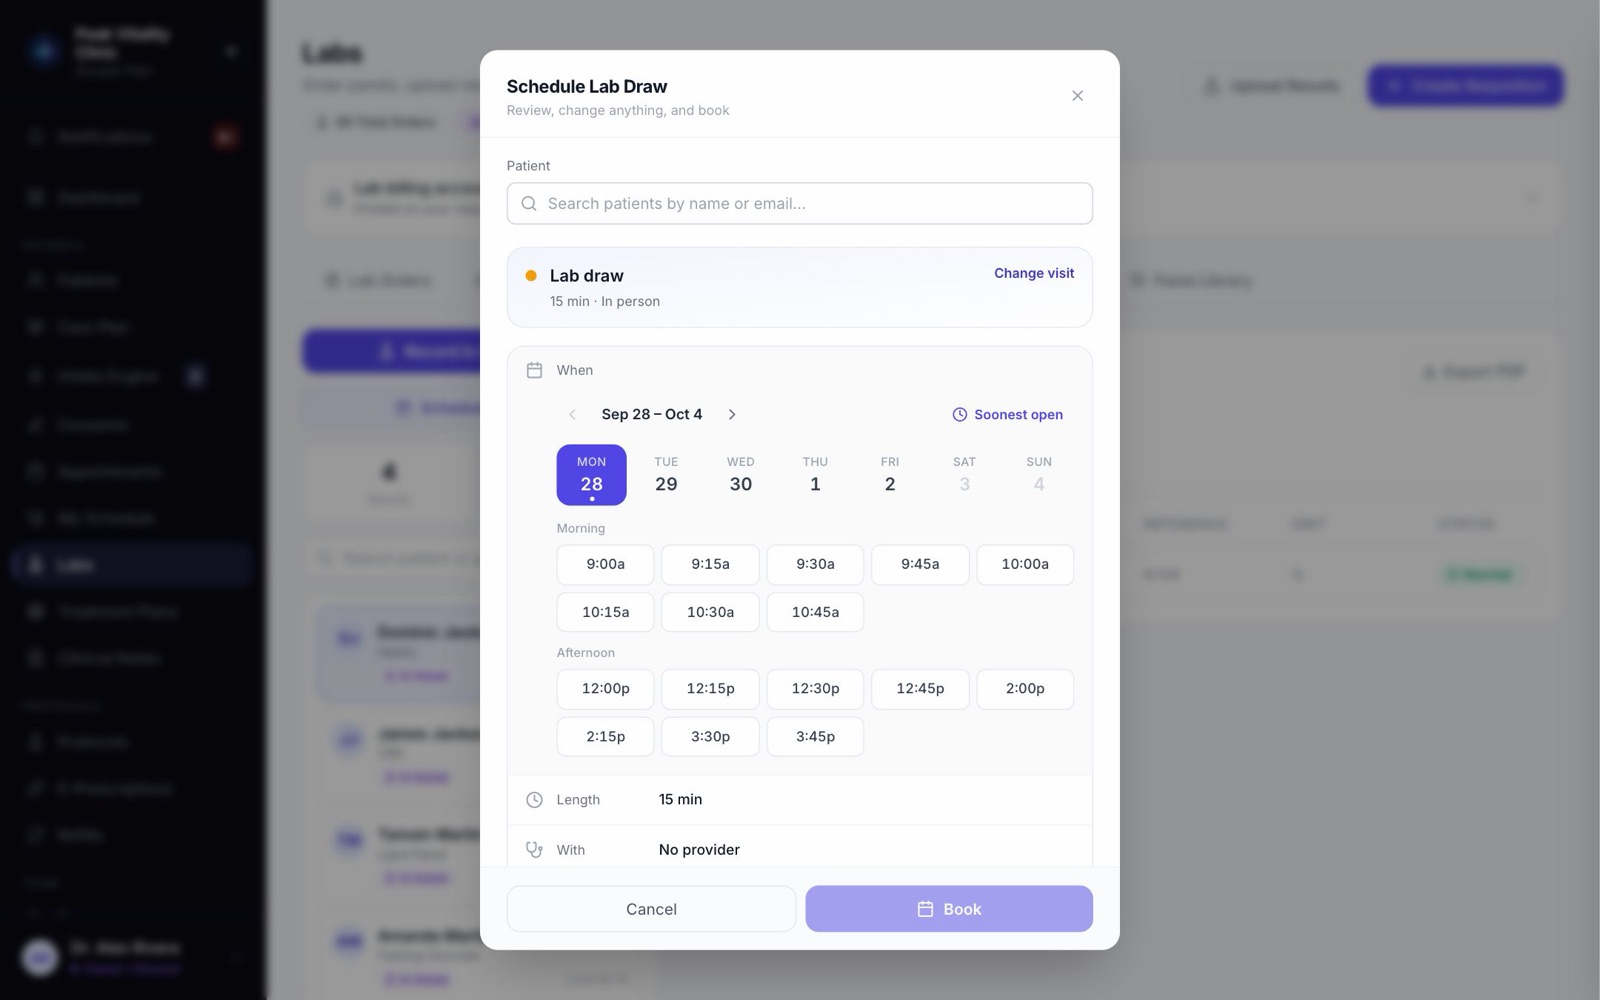
- 1To draw in the clinic, book it: Labs → In-House → Schedule Lab Draw, or Lab draw on the patient’s chart.
- 2When the sample is taken, open the order on Lab Orders and press Mark Collected (Processing).
- 3The order moves from Ordered to Processing.
6While you wait
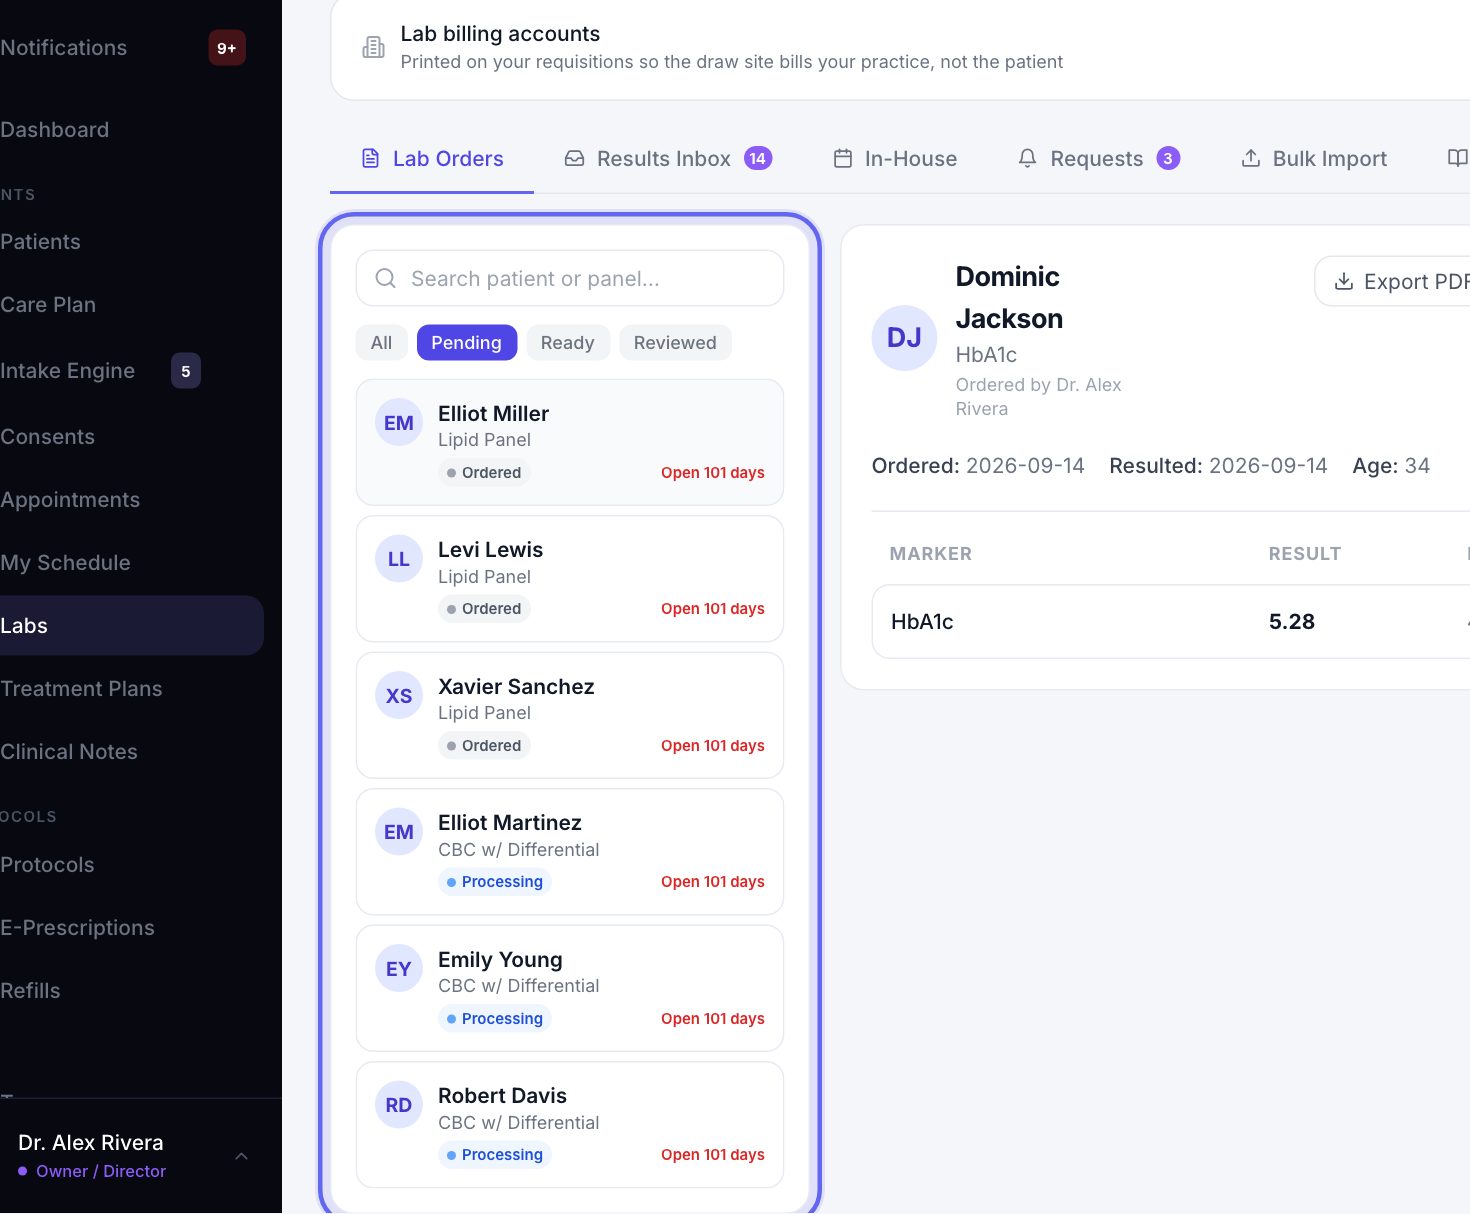
- 1Awaiting Results at the top of Labs counts orders still out with the lab.
- 2On Lab Orders, the Pending filter shows just those.
- 3An order open three days or more shows how long, in amber. After two weeks it turns red, so a lost sample doesn’t go unnoticed.
7When the result comes back
- 1For an order placed through a connected lab, it files to the chart by itself and waits in Results Inbox as Awaiting review.
- 2A result with no matching order waits under Waiting for a chart. That includes results faxed to your results number and reports added with Bulk Import.
- 3Press Review. Check the values against the page with Extracted values and Source document.
- 4Pick the patient. Likely matches are listed first, or search for someone else. Press File to chart.
- 5Not yours? Press Not for this clinic, say why, and press Dismiss.
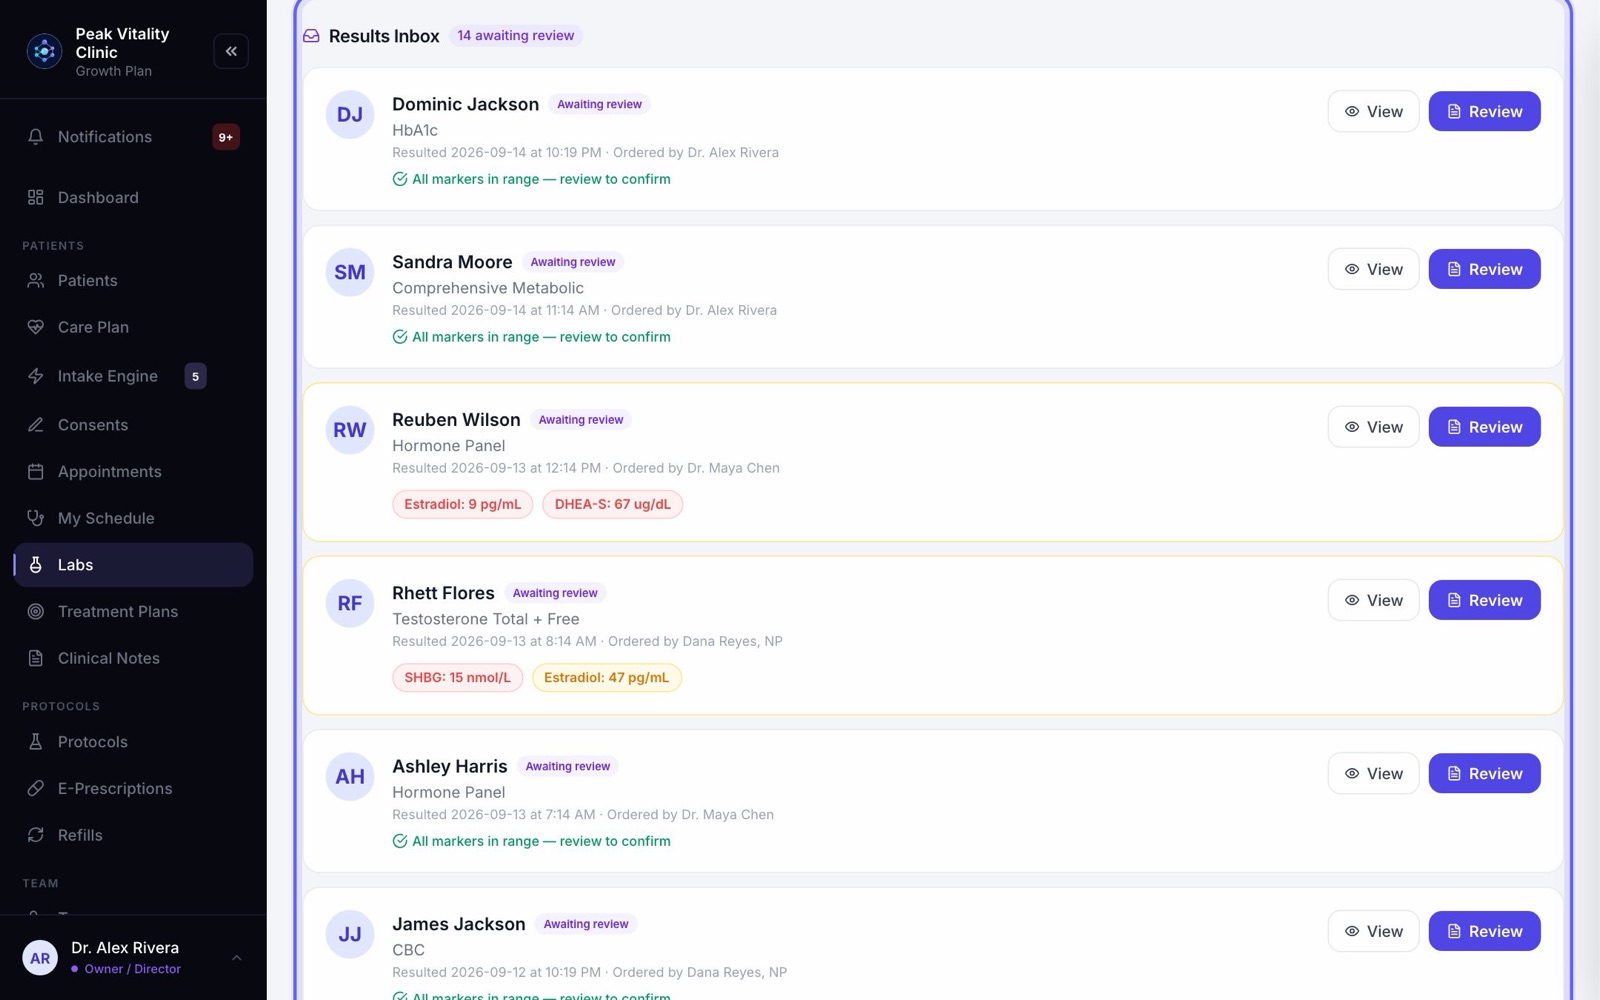
Watch for the tags on a result: CRITICAL, CORRECTED when the lab changed a value it sent before, and PRELIMINARY when the lab isn’t finished.
8Or upload it yourself
- 1Got the report on paper or as a PDF? On Labs, press Upload Results.
- 2Add the file, pick the Patient, and press Scan Document. The values are read off the page.
- 3If the name on the report doesn’t match the chart, it stops and shows you both. Press Pick a different patient, or, when it could be the same person, Same person — continue.
- 4Check the values, press Done, and you land on the result.
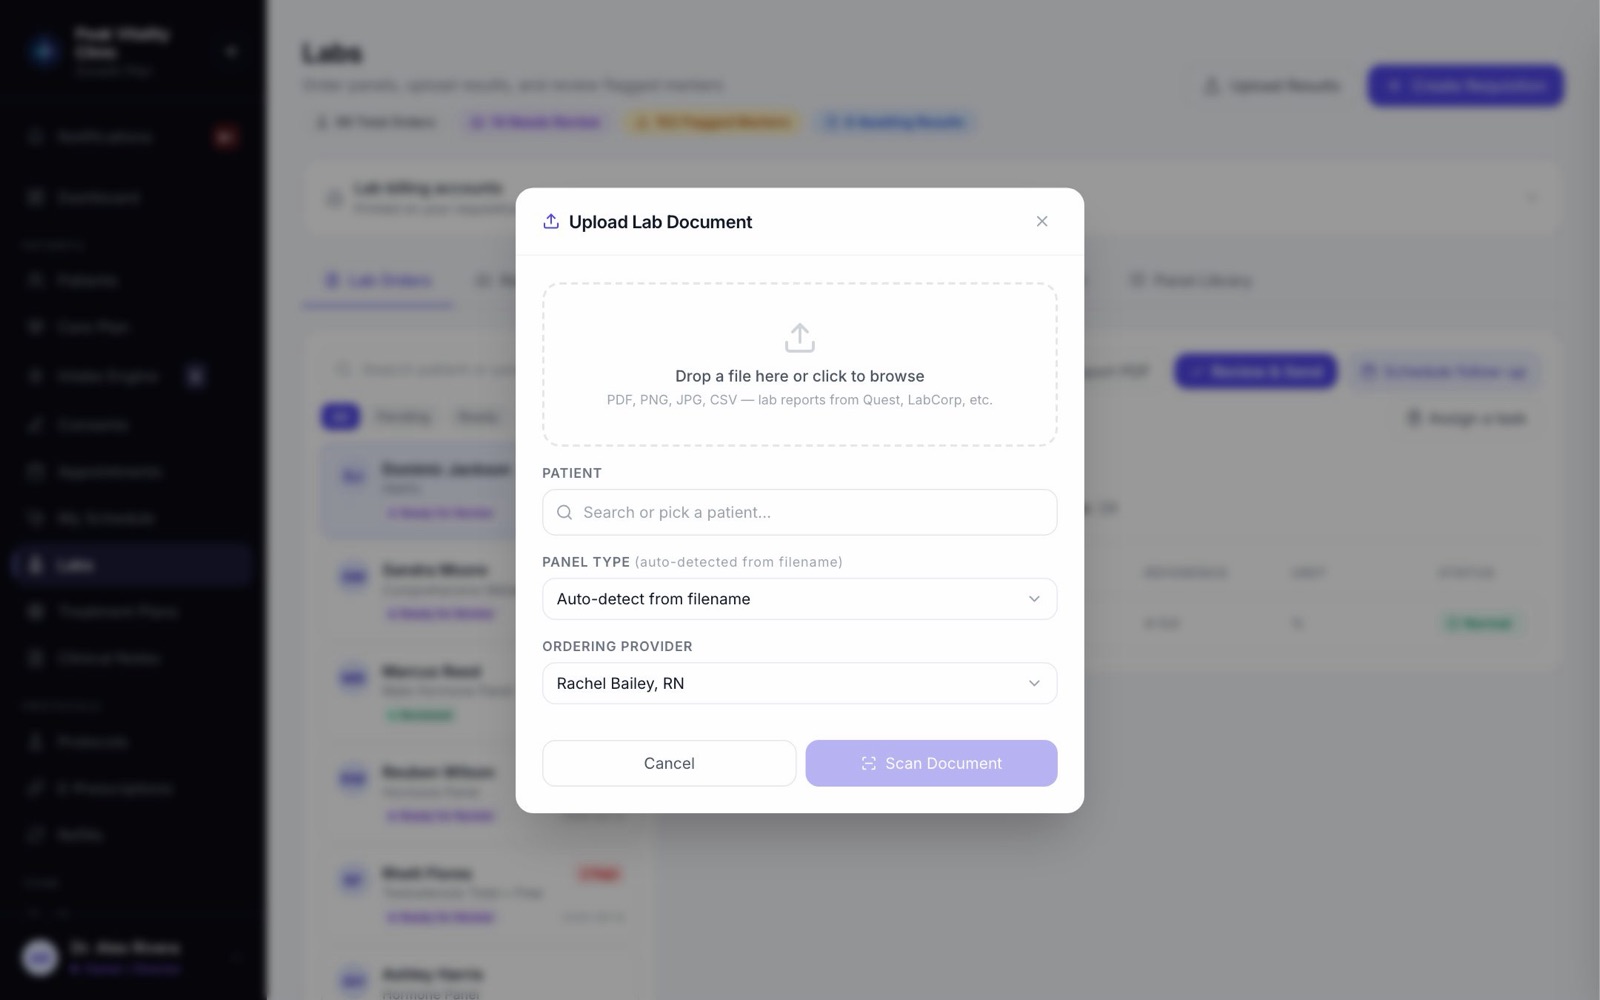
If the date of birth on the report is different, it won’t file. An owner or practice manager can file it anyway with a written reason, and the difference stays visible on the result.
9Read the flags
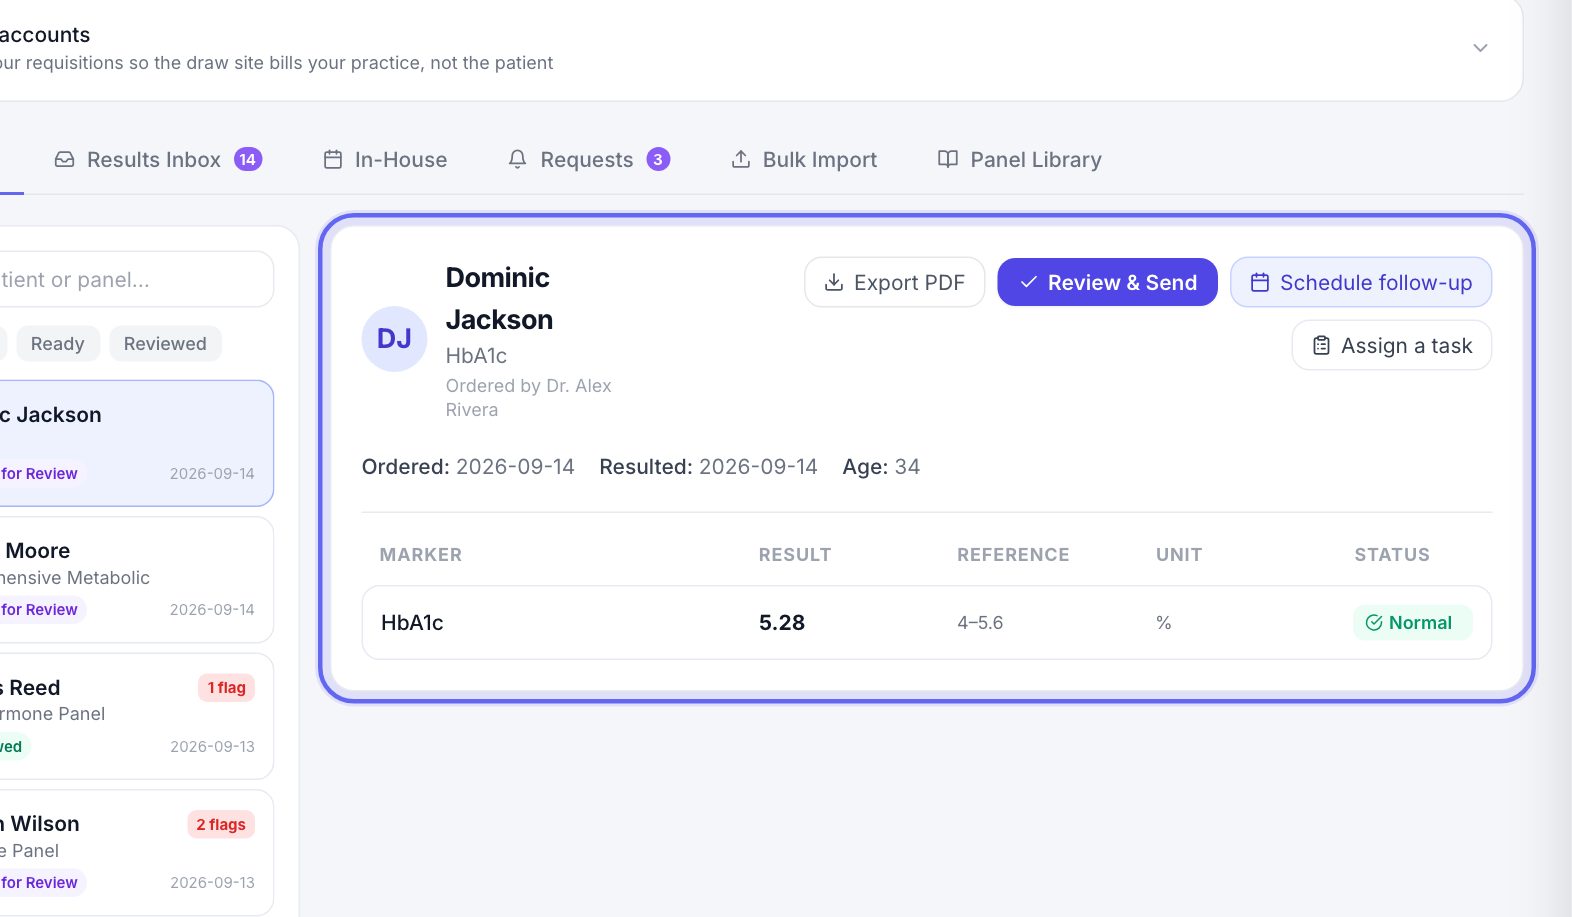
- 1Each marker shows its result, the lab’s reference range, the unit and a flag.
- 2Normal, High and Low compare the value to its range. Critical means it is at a dangerous level.
- 3Found means a word result like “Positive” or “Detected”.
- 4As reported means a word result like “Negative”, with no range to check it against.
- 5Review means the report printed no range, so a person has to judge it.
10Critical values come first
- 1A result with a value at a dangerous level shows a red CRITICAL value — acknowledgement required banner.
- 2Press CRITICAL — Acknowledge on Lab Orders, or Acknowledge in Results Inbox.
- 3Until then it can’t be filed or released. Afterward, the banner says who acknowledged it and when.
11Review it
- 1In Results Inbox, press Review. On Lab Orders, the same button says Review & Send.
- 2Read the out-of-range markers, and any the report printed no range for.
- 3If the result came with a page, switch to Original report to read it.
- 4Write what you decided under Provider Review Notes.
- 5Need to see them? Press Schedule follow-up to book a visit, or Assign a task to hand it to someone. Neither one releases the result.
12File it, or release it
- 1File to chart signs it off and keeps it on the chart, hidden from the patient. It shows as Filed · not released.
- 2Release to patient puts it in their app. They get a notice, unless you switched that notice off in Settings → Notifications.
- 3Tick On release, also send my note to their messages to send your note too.
- 4If you wrote a note, it is saved to the chart as a Lab Review note.
- 5Filed a result from Waiting for a chart onto the wrong patient? Press Wrong patient in the review popup to send it back.
Practice patients never get emails or texts.
13Fix a value
- 1In Results Inbox, press View on the result.
- 2Press Edit results. Correct a value, or add one the report missed.
- 3Press Save results. The flags are worked out again from what you typed.
14On the patient’s chart
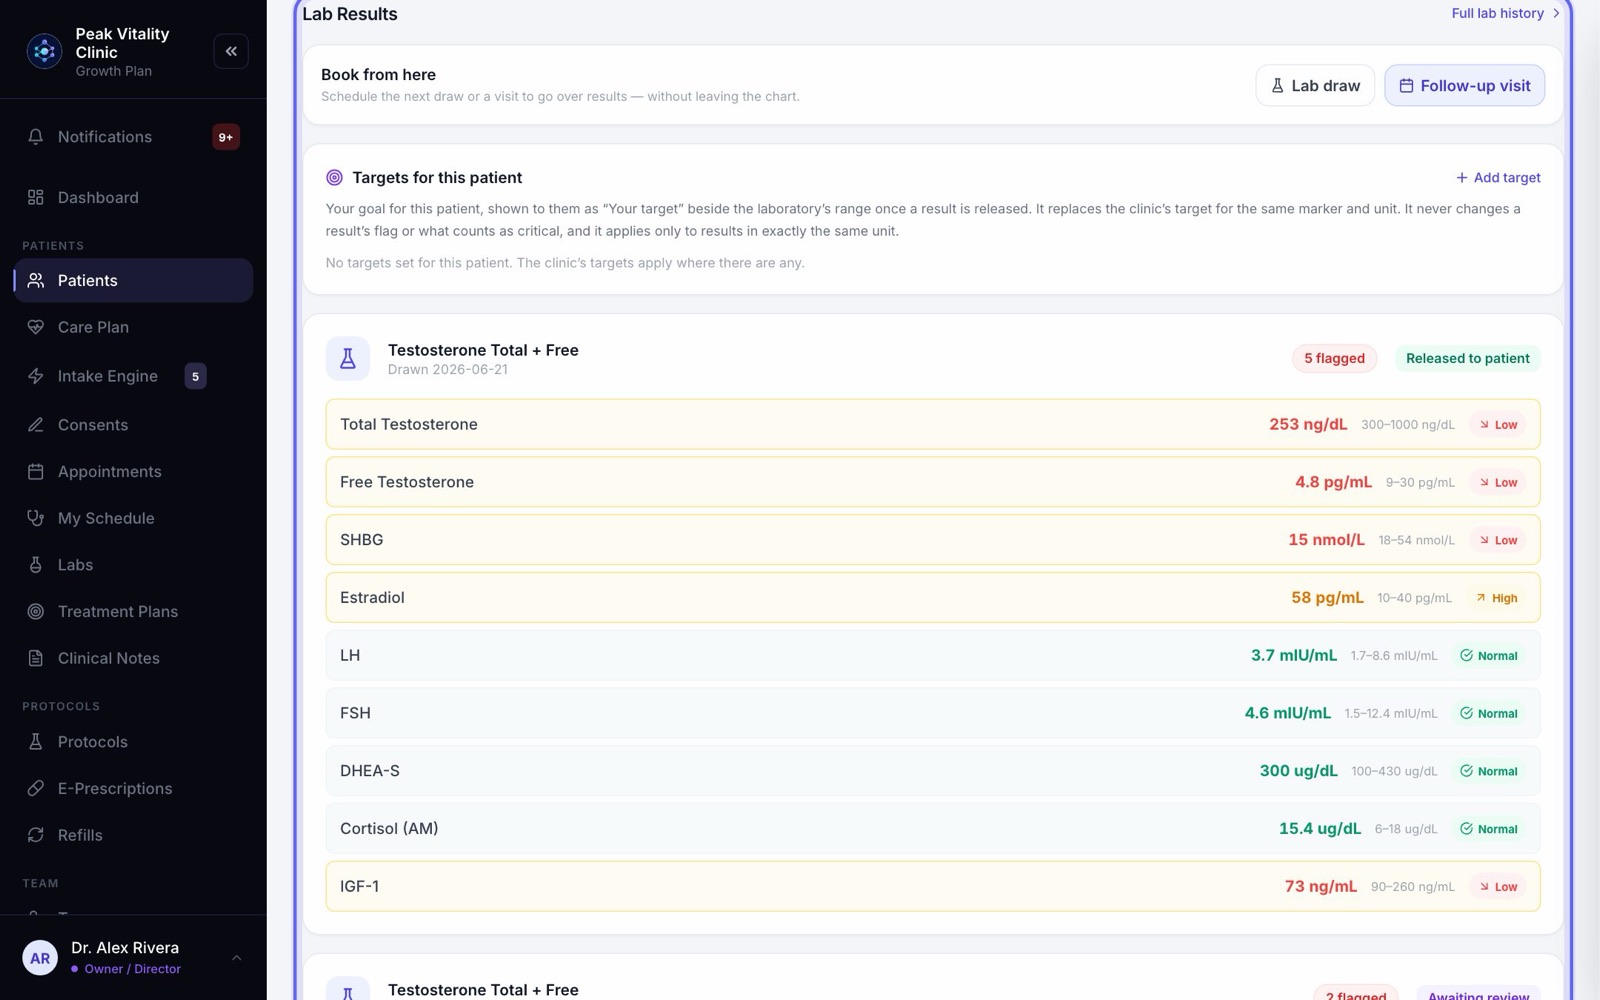
- 1Open the patient and click the Labs tab.
- 2Each panel shows the draw date, how many values are flagged, and whether it is Awaiting review, Filed · not released or Released to patient.
- 3File to chart and Release to patient work here too.
- 4Under Book from here, press Lab draw for the next draw, or Follow-up visit to go over results.
15What the patient sees
Only results you released. They see each value with the lab’s range, and your target beside it if you set one.
If Lab Results is off in Settings → Patient Portal, they don’t see lab results in their app at all.
Keep going
Labs
Order tests, bring results in, and review them before patients see them. Every lab in the clinic, on one page.
Read the guideSet up labs
Add your lab accounts and order codes, choose how results get in, and decide which panels patients can ask for.
Read the guideThe patient chart
Everything about one patient on one page. The header says who they are and what’s next; the tabs below hold each part of their record.
Read the guideThe patient app
Your patients’ side of Aminova, screen by screen: how they get in, what each tab does, and where each thing they do shows up for your team.
Read the guideRather be shown?
Inside Aminova, the tutorial walks you through every page, and the Getting started checklist shows you each task click by click. Or book a live training session with our team.