1The page at a glance
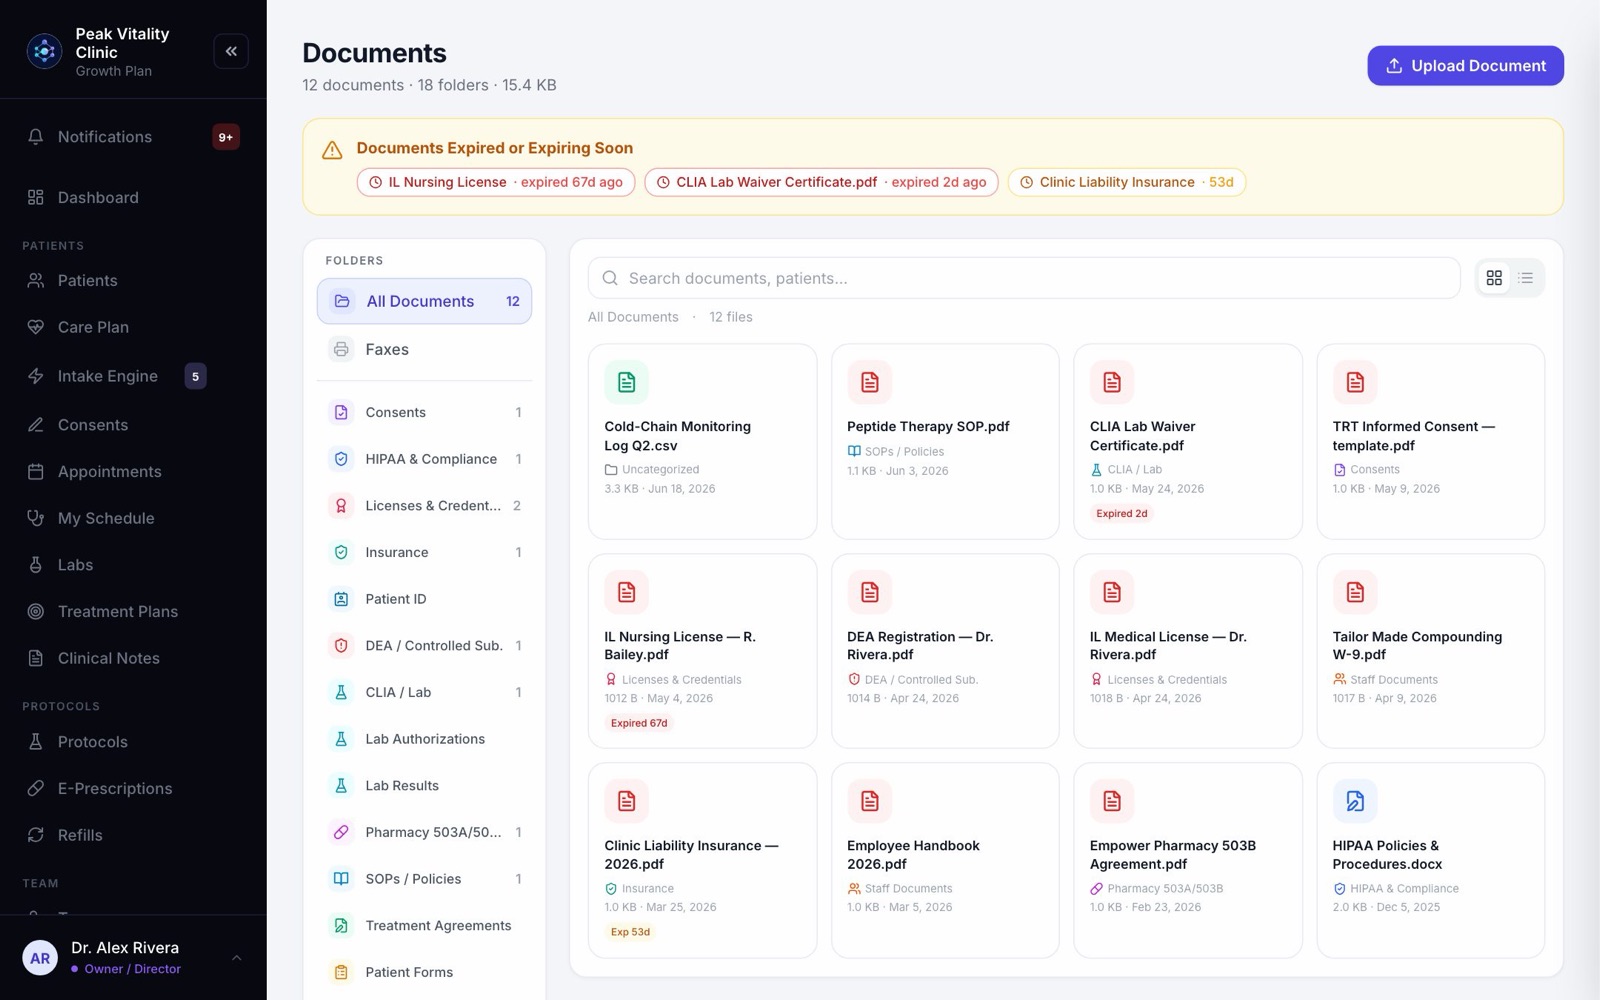
On the left are your folders, with Faxes near the top. In the middle are the files in the folder you picked. Click a file and its details open on the right.
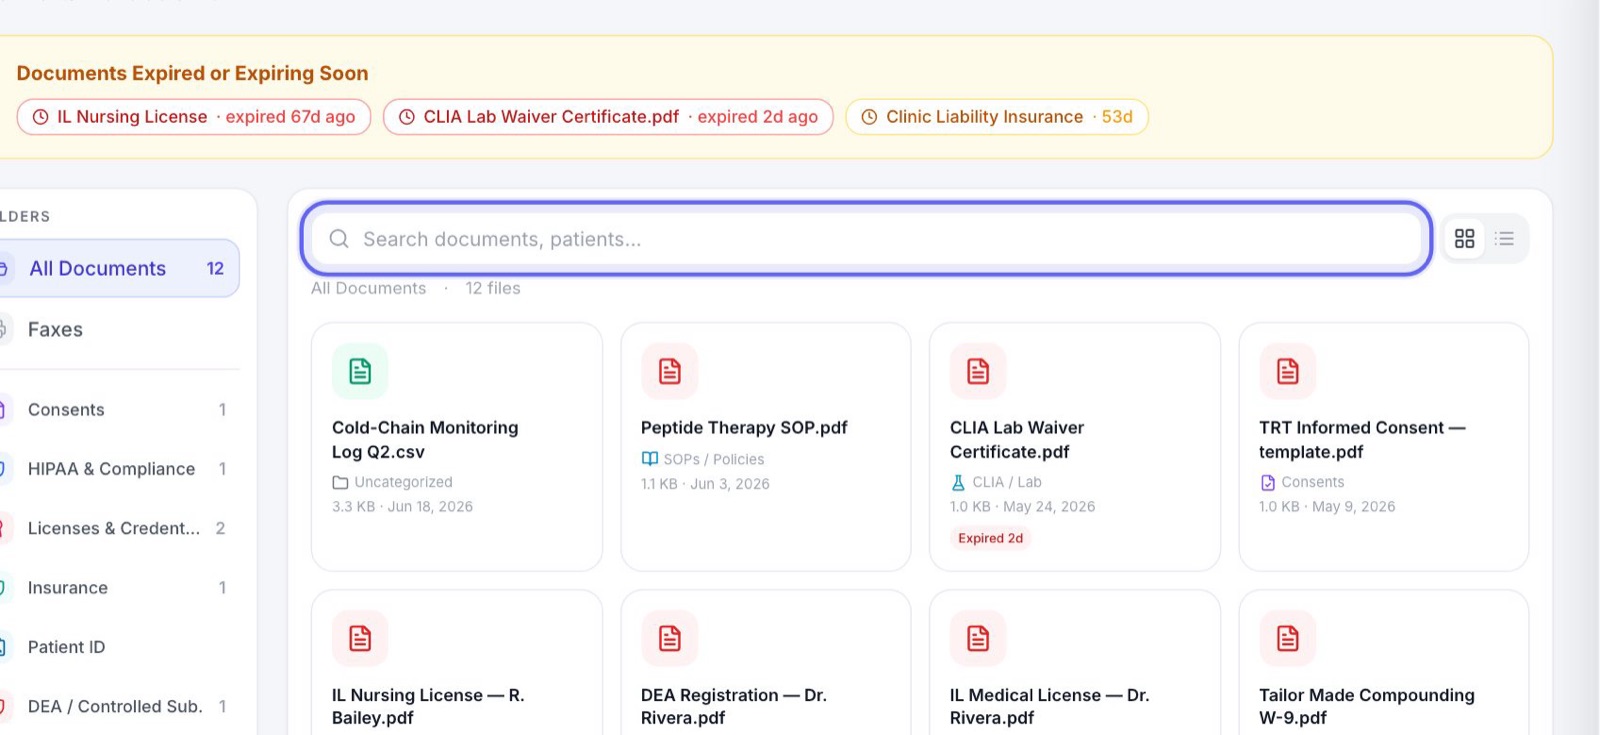
The top of the page says how many documents you have. Above the files, a yellow box lists anything about to expire, and a blue box counts documents waiting for a patient to sign.
2Folders
- 1All Documents shows everything.
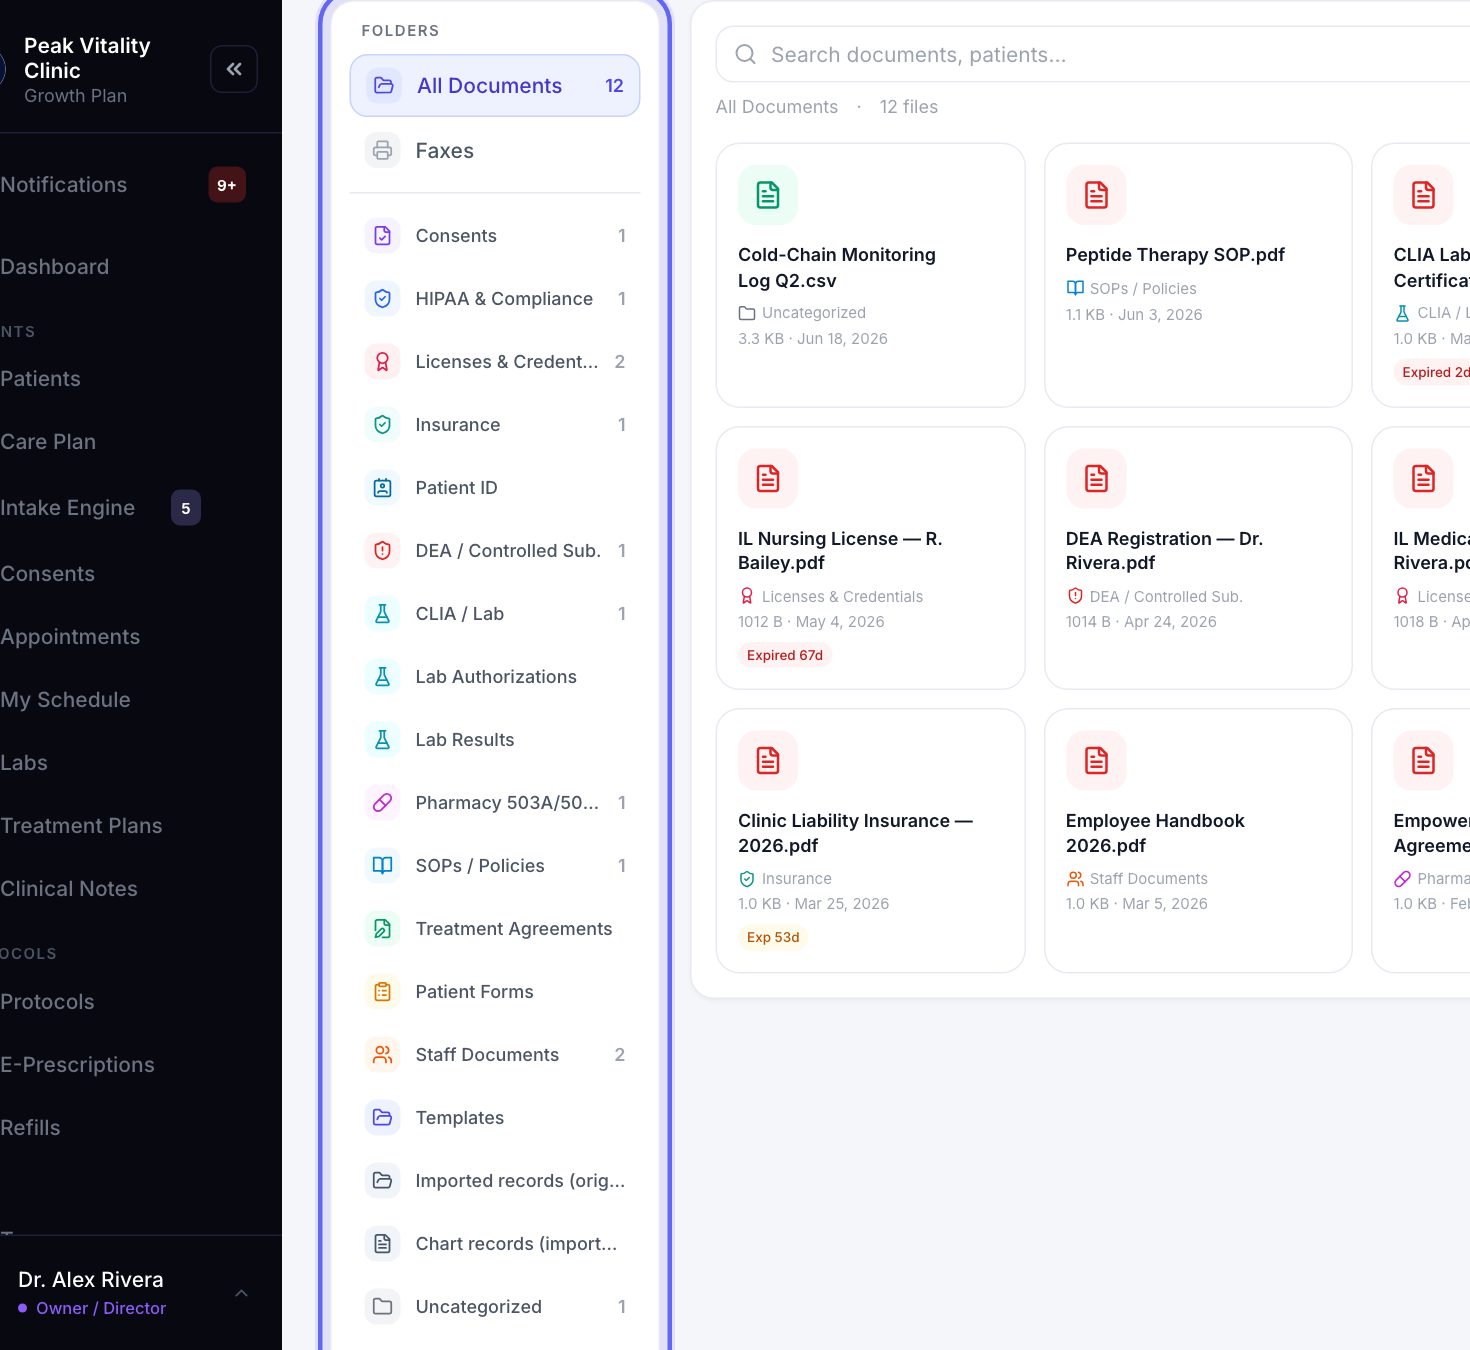
- 2Every file lives in one folder, like Consents, Licenses & Credentials, Lab Results or Staff Documents. The number beside a folder is how many files are in it.
- 3Click a folder to see only what is inside.
- 4Uncategorized holds files that aren’t in any other folder.
3Upload a document
- 1Click Upload Document.
- 2Drop a file in the box, or click it to browse. PDF, Word, JPG, PNG and CSV files work.
- 3Give it a Document Name, or leave it to use the file name.
- 4Add a Version and an Expires date if it has them.
- 5Under Link to Patient, pick the patient if the file is theirs.
- 6Pick a folder under Save to Folder and press Upload.
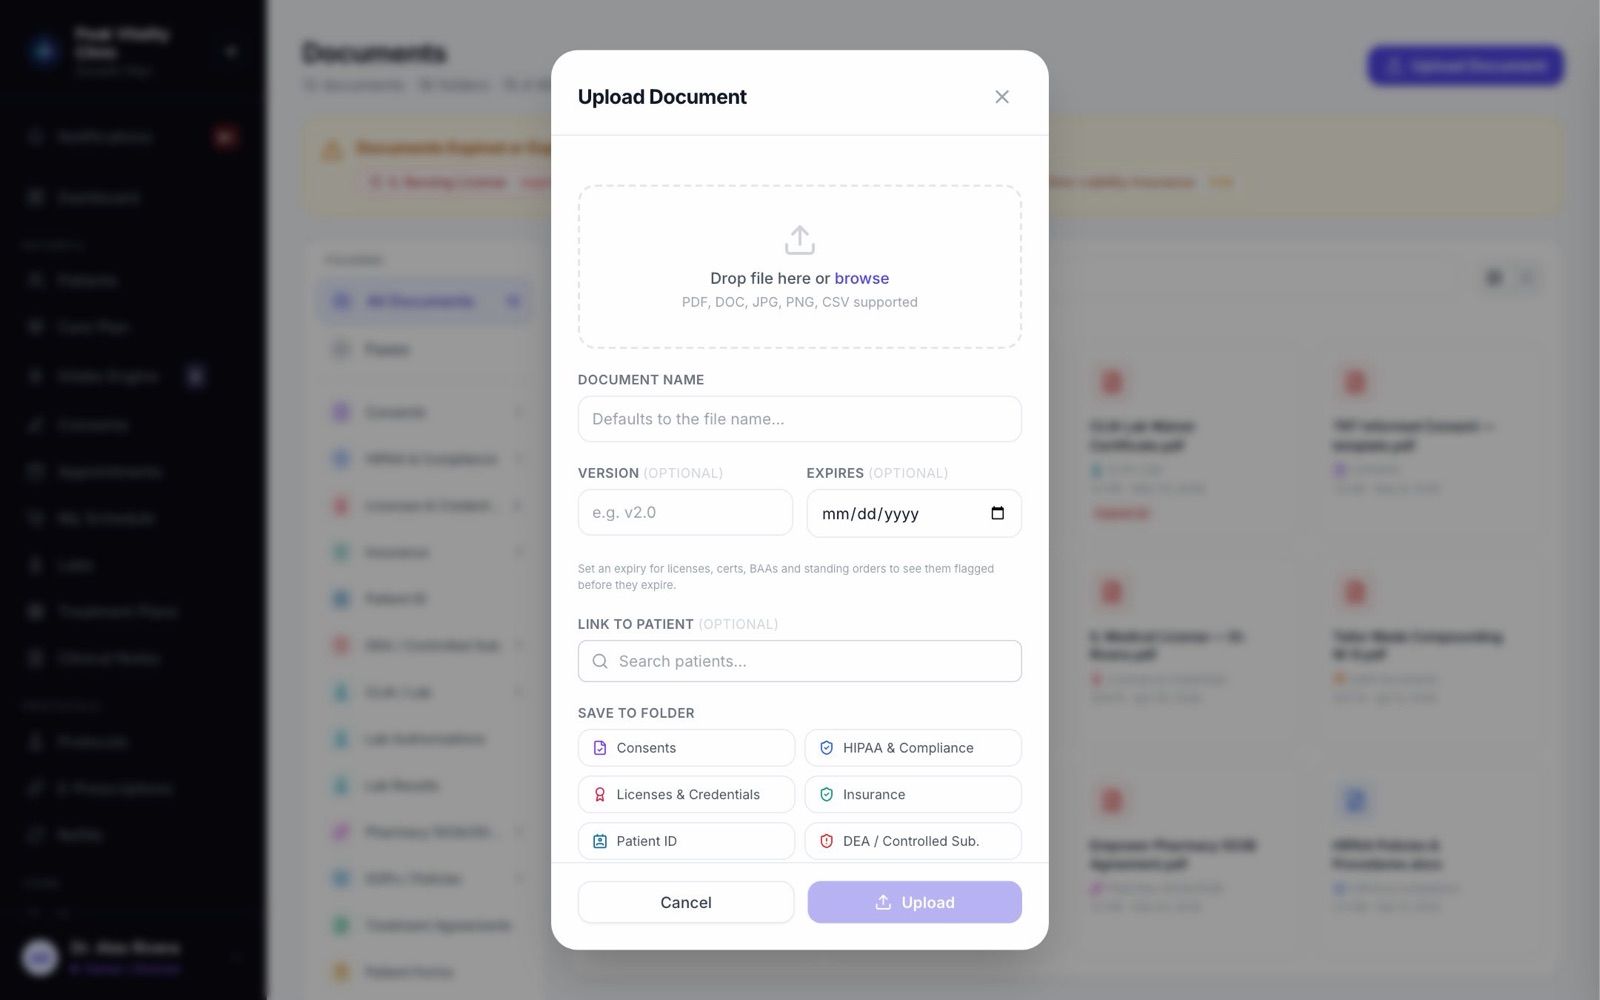
Give licenses, certificates, agreements and standing orders an expiry date. They are flagged before they run out.
4Find a document
- 1Type in Search documents, patients… to find a file by its name or by the patient’s name.
- 2The two buttons beside the search switch between cards and a list.
- 3A long folder is split into pages. Use the arrows and page numbers at the bottom.
5The tags on each file
- 1The first name in purple is the patient the file belongs to.
- 2Exp and a number counts the days until it expires. Expired shows in red.
- 3Pending sig. means it went to a patient to sign. Signed means they did.
- 4Superseded means a newer version was uploaded.
6One document
- 1Click a file. Its details open on the right: folder, who uploaded it, date, size, and when it expires.
- 2Quick View opens the file right on the page. Download saves a copy.
- 3Upload New Version adds a newer copy. The old one is kept and marked Superseded.
- 4Move to Folder files it somewhere else. The pencil renames it.
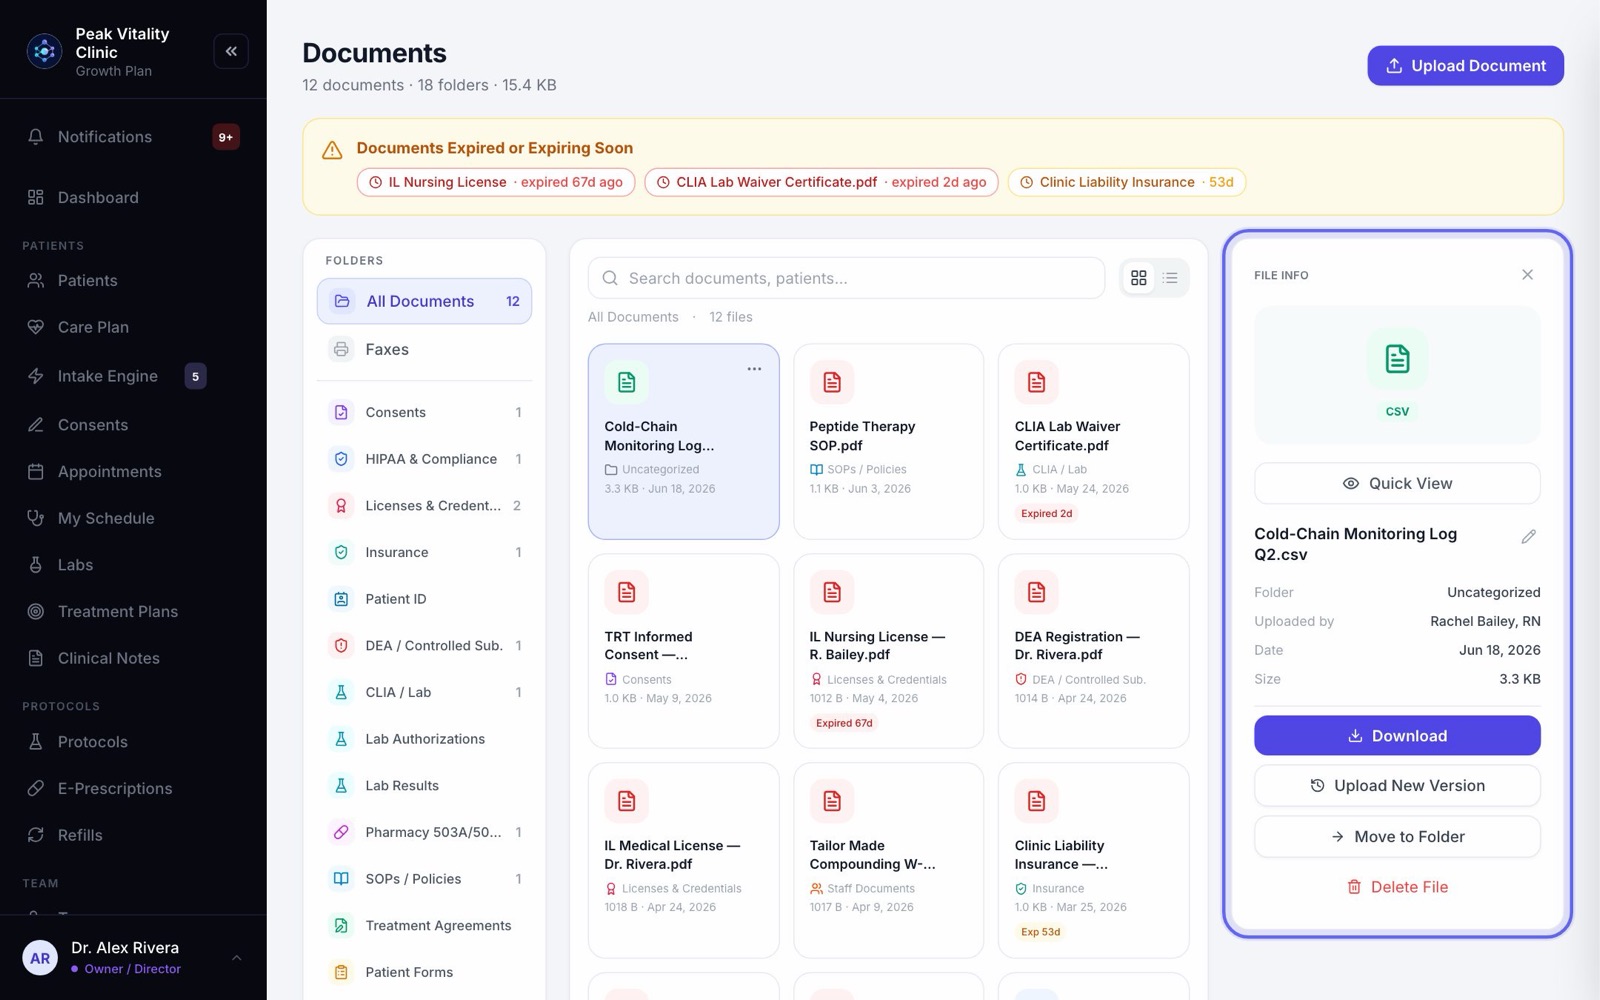
The … menu on each file has the same choices, without opening it.
7Send a document for signature
- 1Open a file in Consents or Treatment Agreements and press Send for Signature.
- 2For a PDF, place where the patient signs and dates it, then save.
- 3Pick the patient under Send to Portal Patient and press Send to Portal.
- 4The patient sees the request the next time they open their patient app. The file shows Pending sig. until they sign.
For the forms you send to every patient, use the Consents page instead. It tracks who has signed what.
8Delete a document
- 1Open the file and press Delete File, or pick Delete in its … menu.
- 2A box names the file and asks you to be sure. A deleted file can’t be brought back.
- 3Only owners and managers can delete.
If the same file was uploaded twice, an amber button appears at the top that says how many copies it found. It keeps the oldest one and removes the rest.
9Your own folders
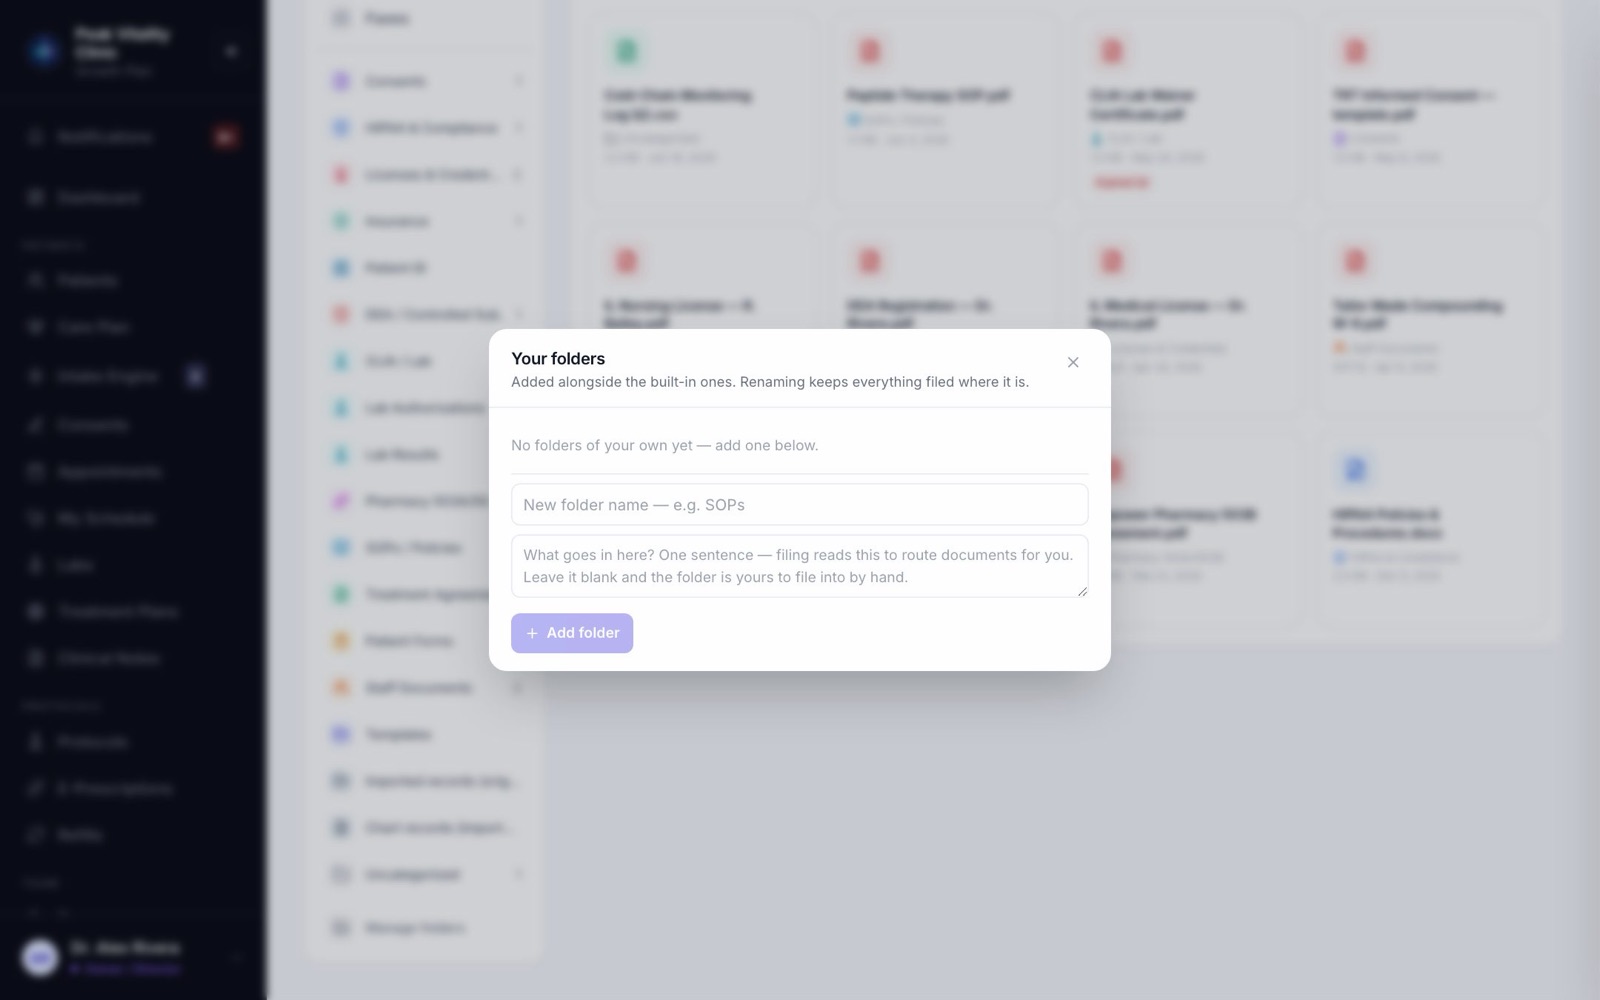
- 1Click Manage folders at the bottom of the folder list.
- 2Type a New folder name. Add one sentence on what goes in it, or leave it blank to file into it by hand. Press Add folder.
- 3Use the pencil to rename a folder. Its files stay where they are.
- 4Use the trash can to remove one. It asks where its files should go, then press Move and remove.
10Faxes
- 1Click Faxes in the folder list. The red number is how many new faxes you haven’t read.
- 2Your clinic’s fax number shows at the top. Click it to copy it.
- 3The Received tab lists faxes sent to you. Click Open to read one, and Mark read when you’re done.
- 4Search by sender, number or patient, or filter by state and date.
11File a fax to a chart
- 1A new fax isn’t on anyone’s chart yet. It shows a red Needs a patient tag.
- 2Click the tag, then search for the patient. Picking them files it to their chart.
- 3Not in the system yet? Pick Add a new patient in the same search.
- 4Click the tag icon to save the sender’s name, so it shows on every fax from that number.
12Send a fax
- 1Click Send a fax.
- 2Under To, pick a saved contact, or click Type a number instead.
- 3Under What to send, choose A document on a chart, A file from this computer or A records request.
- 4Pick the patient and the document, or choose the file. A file can be up to 10 MB and 49 pages.
- 5Check This will send and press Send fax. A cover sheet is added for you.
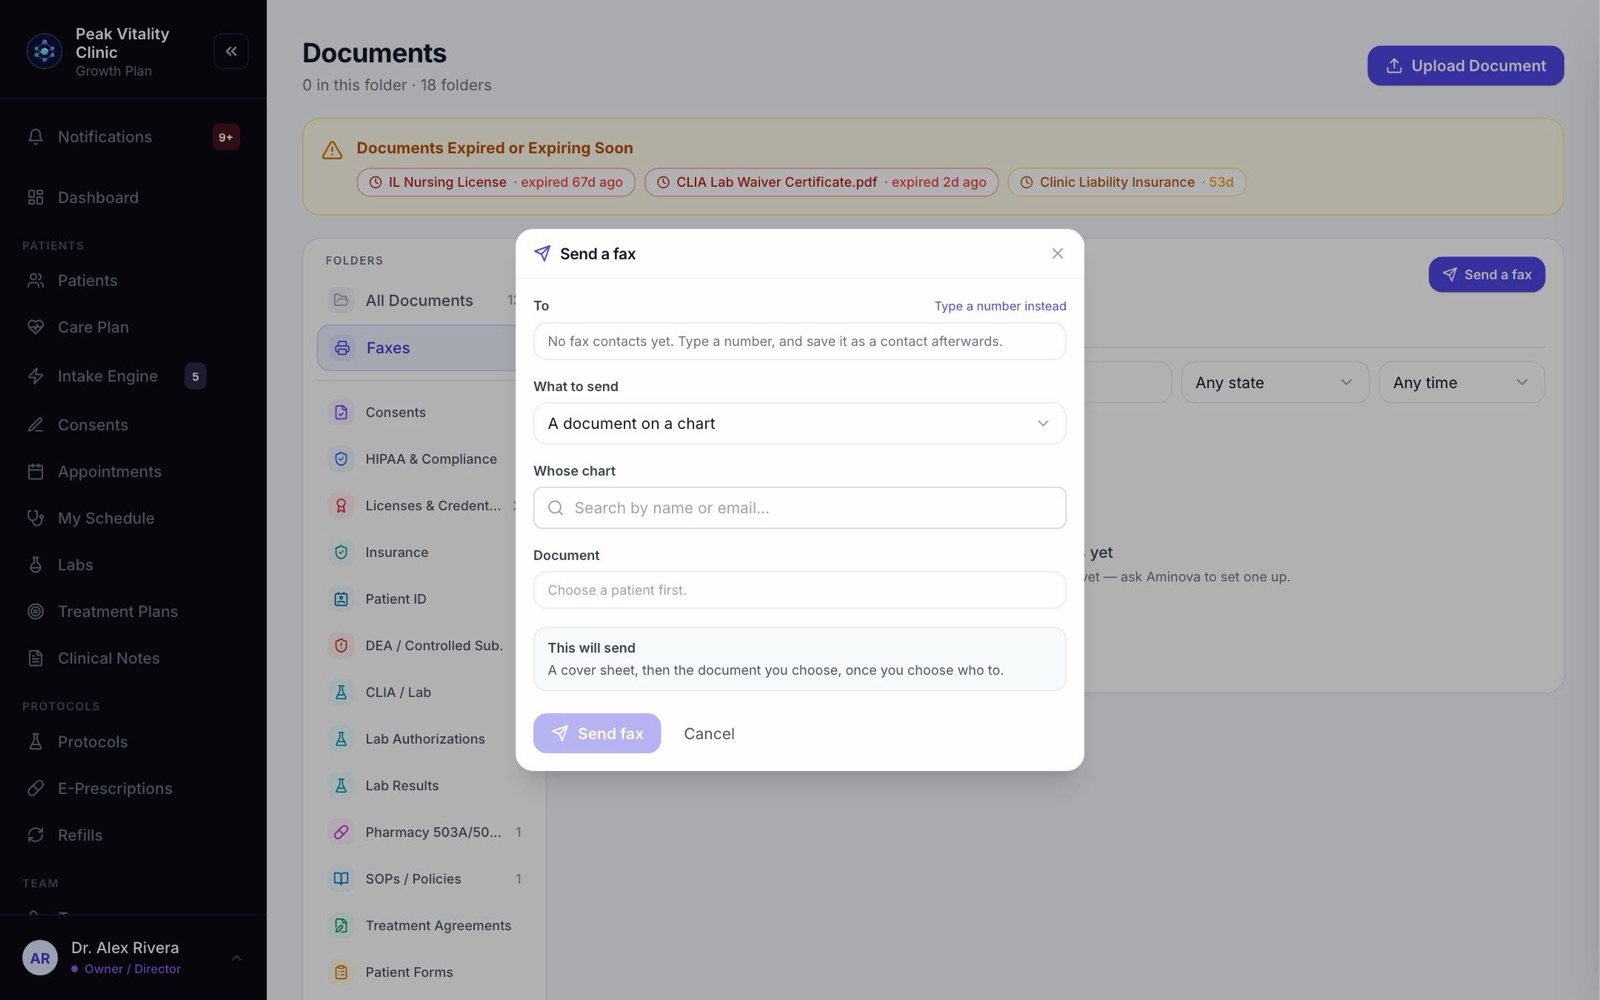
A records request only goes with the patient’s signed release. An unsigned form is refused.
13Sent faxes
- 1The Sent tab lists every fax you sent, with its state: Queued, Sending, Sent, Failed or Needs checking.
- 2A failed fax shows the reason it didn’t go, like a number that is out of service.
- 3The red number on the tab is how many need a look.
14Fax contacts
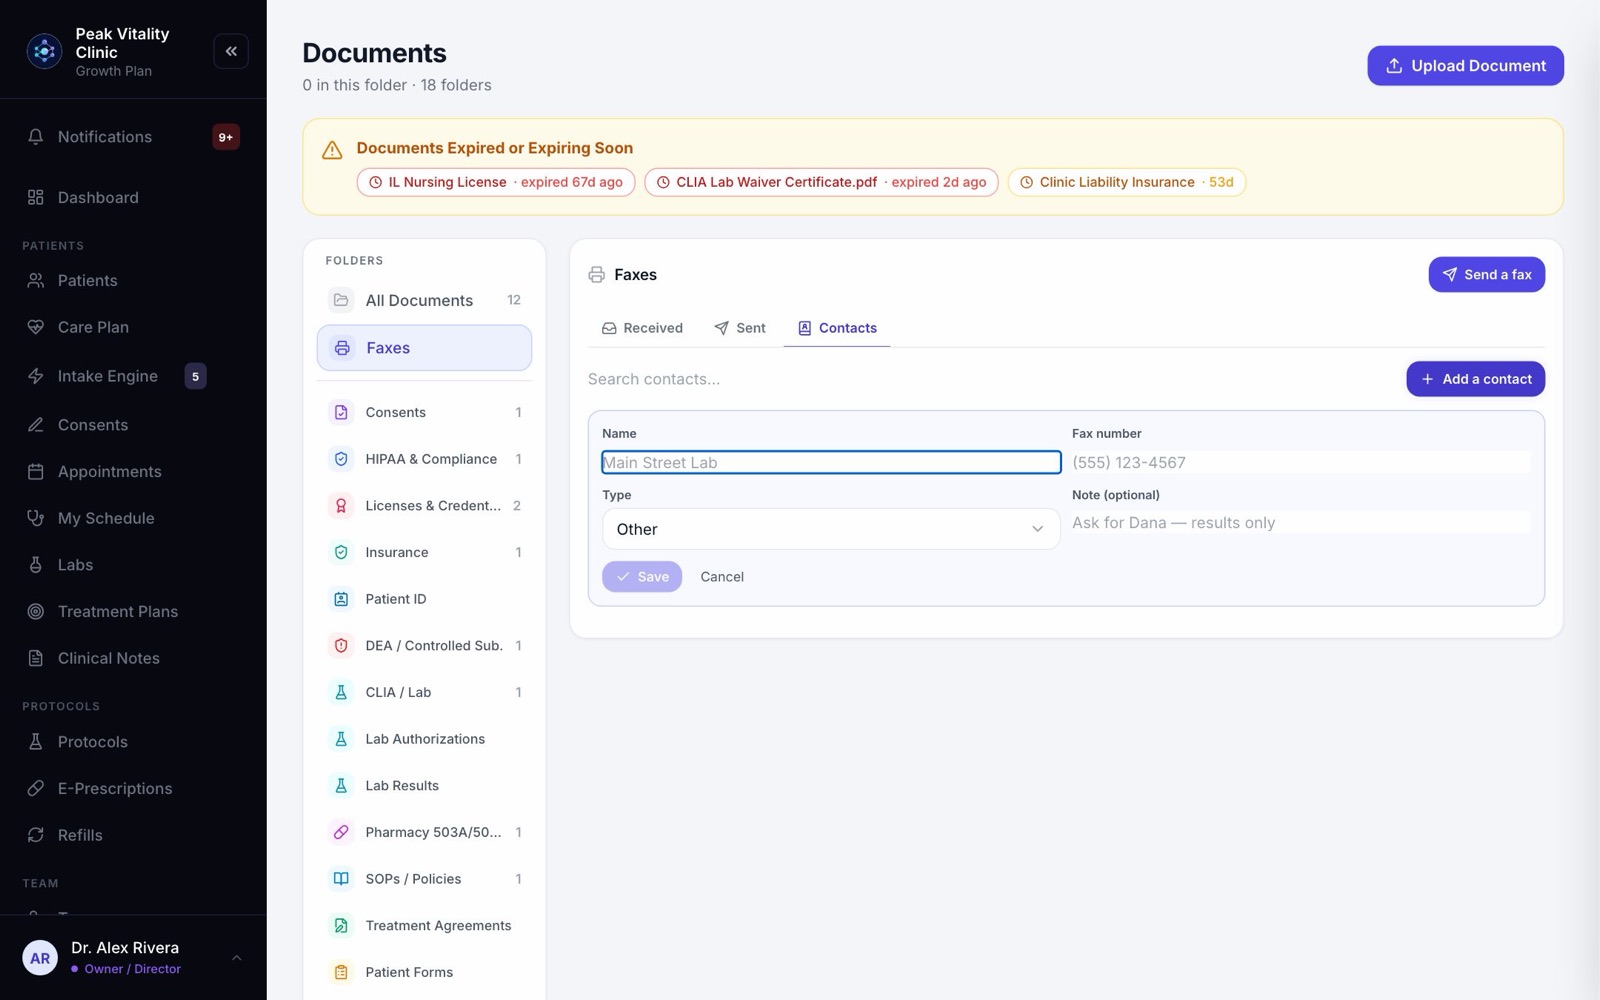
- 1The Contacts tab keeps the fax numbers you use, by name.
- 2Click Add a contact. Fill in the Name, Fax number, Type and a Note if you like, then press Save.
- 3Pick a contact under To when you send a fax.
Keep going
Consents
Your consent forms, and who has signed them. Send forms, hand the tablet over in the office, and keep your library of forms in order.
Read the guideThe patient chart
Everything about one patient on one page. The header says who they are and what’s next; the tabs below hold each part of their record.
Read the guideLabs
Order tests, bring results in, and review them before patients see them. Every lab in the clinic, on one page.
Read the guideForms and consents, start to finish
A visit is booked, its paperwork goes out, the patient fills it in at home or on a tablet, and the answers come back to you. Here is every step, and what your team signs.
Read the guideBring your patients over from your old system
Move your patients, charts, documents and forms into Aminova. Upload the files, check what was found, approve it, then look around before you make it final.
Read the guideRather be shown?
Inside Aminova, the tutorial walks you through every page, and the Getting started checklist shows you each task click by click. Or book a live training session with our team.